> ## Documentation Index
> Fetch the complete documentation index at: https://skyvern.com/docs/llms.txt
> Use this file to discover all available pages before exploring further.
# Handle 2FA
> Configure two-factor authentication for Skyvern automations using TOTP secrets, pushed verification codes, pull-based endpoints, or magic links. Supports Bitwarden TOTP integration.
Many websites require two-factor authentication (2FA) during login. Skyvern supports multiple 2FA methods to handle these flows automatically.
***
## Choose your method
Select the method that matches how you receive verification codes:
| Scenario | Recommended Method |
| --------------------------------------- | ------------------------------------------------------------------------------ |
| You have the TOTP secret key | [Store TOTP secret](#method-1-store-totp-secret): Skyvern generates codes |
| Codes sent to email/SMS you can forward | [Push codes to Skyvern](#method-2-push-codes-to-skyvern) |
| Codes sent to a system you control | [Skyvern pulls from your endpoint](#method-3-skyvern-pulls-from-your-endpoint) |
| Passwordless/magic link auth | [Magic links](#method-4-magic-links) |
| Using Bitwarden with TOTP | [Password manager integration](#password-manager-totp) |
***
## Method 1: Store TOTP secret
**Best for:** Sites where you have access to the TOTP secret (the setup QR code or manual key).
When you enable 2FA on a website, you're typically shown a QR code or a secret key. Store this secret with your credential, and Skyvern generates valid codes automatically.
In the Skyvern UI, paste the manual key or full `otpauth://` URI into **Authenticator Key**. You can also click **Scan QR** and upload a QR code image from the site's 2FA setup screen.
```python Python theme={null}
import os
from skyvern import Skyvern
client = Skyvern(api_key=os.getenv("SKYVERN_API_KEY"))
credential = await client.create_credential(
name="Acme Portal Login",
credential_type="password",
credential={
"username": "user@example.com",
"password": "secure_password",
"totp": "JBSWY3DPEHPK3PXP", # Base32 secret from QR code
"totp_type": "authenticator",
},
)
```
```typescript TypeScript theme={null}
import { SkyvernClient } from "@skyvern/client";
const client = new SkyvernClient({
apiKey: process.env.SKYVERN_API_KEY,
});
const credential = await client.createCredential({
name: "Acme Portal Login",
credential_type: "password",
credential: {
username: "user@example.com",
password: "secure_password",
totp: "JBSWY3DPEHPK3PXP",
totp_type: "authenticator",
},
});
```
```bash cURL theme={null}
curl -X POST "https://api.skyvern.com/v1/credentials" \
-H "x-api-key: $SKYVERN_API_KEY" \
-H "Content-Type: application/json" \
-d '{
"name": "Acme Portal Login",
"credential_type": "password",
"credential": {
"username": "user@example.com",
"password": "secure_password",
"totp": "JBSWY3DPEHPK3PXP",
"totp_type": "authenticator"
}
}'
```
### TOTP types
| Type | Description |
| --------------- | ------------------------------------------------------- |
| `authenticator` | Standard TOTP codes (Google Authenticator, Authy, etc.) |
| `email` | Codes sent via email that you'll push to Skyvern |
| `text` | Codes sent via SMS that you'll push to Skyvern |
Skyvern generates TOTP codes using standard 30-second windows. If the current code has less than 20 seconds remaining, Skyvern automatically uses the next code to ensure successful entry.
### Finding your TOTP secret
Most sites show the secret when you set up 2FA:
1. Go to your account's security settings
2. Click "Set up authenticator app"
3. Look for "Can't scan the QR code?" or "Manual entry"
4. Copy the secret key (usually Base32 format like `JBSWY3DPEHPK3PXP`)
If you've already set up 2FA and don't have the secret, you may need to disable and re-enable 2FA to see the secret again. Contact [support@skyvern.com](mailto:support@skyvern.com) for help.
***
## Method 2: Push codes to Skyvern
**Best for:** Codes sent to email or SMS that you can programmatically forward.
When your automation encounters a 2FA prompt, Skyvern polls for codes that you push via API. Your email or SMS forwarding system sends codes to Skyvern as they arrive.
### Step 1: Set up code forwarding
Configure your email or SMS to forward verification codes to Skyvern. Common approaches:
* **Email:** Gmail filter + Zapier webhook
* **SMS:** Twilio webhook to your server
* **Email:** AWS SES + Lambda function
This setup requires a Zapier Pro plan account.
1. Go to [zapier.com](https://zapier.com/app/home) and create a new Zap
2. In the newly created Zap draft, click the "Trigger" button
3. Click **Email by Zapier**
4. In the Email "Setup", pick **New Inbound Email** in the Trigger event selection. Click **Continue**
5. In Email "Configure", create an email address which will be used to forward emails for TOTP codes. Click **Continue**
6. Click the "Action" button and add **Webhooks by Zapier**
7. In the Setup, choose **POST** under the Action event selection. Click **Continue**
8. In the "Configure", set up these fields to make a POST request to Skyvern's TOTP API:
* **URL:** `https://api.skyvern.com/v1/credentials/totp`
* **Payload Type:** `json`
* **Data:**
* `totp_identifier`: choose **Raw To Email** after clicking the "+" sign
* `content`: choose **Body Plain** after clicking the "+" sign
* `source`: `email`
* **Headers:**
* `x-api-key`: your Skyvern API key
9. Click **Continue**
Go to Gmail Settings → Forwarding and POP/IMAP → click **Add a forwarding address** → enter the Zapier email address you created. Complete any verification steps.
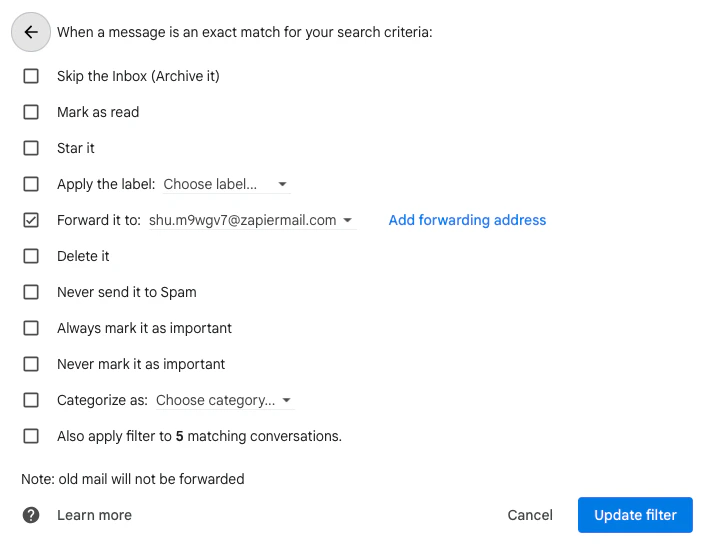
Then go to **Filters and Blocked Addresses**. Click **Create a new filter** and set up a filtering rule for your TOTP (2FA/MFA) emails. Click **Create filter**, check **Forward it to**, pick the Zapier email address, and update the filter.
 Forward any previous TOTP email to the Zapier email address you created.
In Zapier, under the "Test" of the Webhooks action, send a request to test it out. If successful, you should see a "A request was sent to Webhooks by Zapier" message.
Use a virtual phone number service like [Twilio](https://www.twilio.com/en-us/docs/usage/tutorials/how-to-use-your-free-trial-account) or [Plivo](https://www.plivo.com/) to receive SMS codes and forward them to Skyvern.
Create a Twilio account and provision a phone number. This number will receive the SMS verification codes.
In your Twilio console, create a new Function that forwards incoming SMS to Skyvern's TOTP API:
```javascript theme={null}
// Twilio Function
exports.handler = async function(context, event, callback) {
const axios = require('axios');
await axios.post('https://api.skyvern.com/v1/credentials/totp', {
totp_identifier: event.To, // Your Twilio phone number
content: event.Body,
source: 'phone'
}, {
headers: {
'x-api-key': context.SKYVERN_API_KEY,
'Content-Type': 'application/json'
}
});
return callback(null, new Twilio.Response());
};
```
Add your `SKYVERN_API_KEY` as an environment variable in the Twilio Function configuration.
In your Twilio phone number settings, set the **A Message Comes In** webhook to point to your Twilio Function URL.
Send a test SMS to your Twilio number and verify the code appears in Skyvern:
```bash theme={null}
curl -X GET "https://api.skyvern.com/v1/credentials/totp?totp_identifier=YOUR_TWILIO_NUMBER" \
-H "x-api-key: $SKYVERN_API_KEY"
```
### Step 2: Start the run with a TOTP identifier
When running your login, include a `totp_identifier` that matches what you'll use when pushing codes:
```python Python theme={null}
result = await client.login(
credential_type="skyvern",
url="https://portal.example.com/login",
credential_id="cred_xyz789",
totp_identifier="user@example.com", # Must match when pushing code
)
```
```bash cURL theme={null}
curl -X POST "https://api.skyvern.com/v1/run/tasks/login" \
-H "x-api-key: $SKYVERN_API_KEY" \
-H "Content-Type: application/json" \
-d '{
"credential_type": "skyvern",
"url": "https://portal.example.com/login",
"credential_id": "cred_xyz789",
"totp_identifier": "user@example.com"
}'
```
### Step 3: Push the code when received
When the verification code arrives, push it to Skyvern:
```python Python theme={null}
await client.send_totp_code(
totp_identifier="user@example.com",
content="Your verification code is 123456", # Full email/SMS body
source="email",
)
```
```typescript TypeScript theme={null}
await client.sendTotpCode({
totp_identifier: "user@example.com",
content: "Your verification code is 123456",
source: "email",
});
```
```bash cURL theme={null}
curl -X POST "https://api.skyvern.com/v1/credentials/totp" \
-H "x-api-key: $SKYVERN_API_KEY" \
-H "Content-Type: application/json" \
-d '{
"totp_identifier": "user@example.com",
"content": "Your verification code is 123456",
"source": "email"
}'
```
If `content` is longer than 10 characters, Skyvern's AI extracts the verification code automatically. You can send the full email or SMS body without parsing it yourself.
***
## Method 3: Skyvern pulls from your endpoint
**Best for:** Environments where you control the system receiving 2FA codes and can expose them via an HTTP endpoint.
Instead of pushing codes to Skyvern, you implement an endpoint that Skyvern polls until a code is available.
For saved workflows or agents, configure the endpoint on the specific browser block that can encounter 2FA. Use the block's **TOTP Verification URL** field, or set that field to a workflow parameter such as `{{ totp_url }}` and pass the value in `parameters` when starting the run.
Passing `totp_url` only at the top level of a workflow run does not automatically populate every block. If the block's **TOTP Verification URL** is empty, that block will not call your endpoint.
### Step 1: Implement the endpoint
Your endpoint must accept POST requests and return the verification code:
**Request from Skyvern:**
```http theme={null}
POST https://your-server.com/totp-webhook
x-skyvern-signature:
Content-Type: application/json
{
"task_id": "tsk_123456"
}
```
**Expected response:**
```json theme={null}
{
"verification_code": "123456"
}
```
### Step 2: Verify request signatures
Skyvern signs all requests using HMAC-SHA256 with your API key. Verify the signature to ensure requests are authentic:
```python theme={null}
import hmac
import hashlib
def verify_skyvern_request(request, api_key: str) -> bool:
signature = request.headers.get("x-skyvern-signature")
payload = request.body # bytes
expected = hmac.new(
api_key.encode("utf-8"),
msg=payload,
digestmod=hashlib.sha256
).hexdigest()
return hmac.compare_digest(signature, expected)
```
### Step 3: Configure the login or block
For a one-off login task, pass `totp_url` in the login request:
```python Python theme={null}
result = await client.login(
credential_type="skyvern",
url="https://portal.example.com/login",
credential_id="cred_xyz789",
totp_url="https://your-server.com/totp-webhook",
)
```
```bash cURL theme={null}
curl -X POST "https://api.skyvern.com/v1/run/tasks/login" \
-H "x-api-key: $SKYVERN_API_KEY" \
-H "Content-Type: application/json" \
-d '{
"credential_type": "skyvern",
"url": "https://portal.example.com/login",
"credential_id": "cred_xyz789",
"totp_url": "https://your-server.com/totp-webhook"
}'
```
For a saved workflow or agent, configure the block that may see the 2FA prompt:
1. Open the browser, action, file download, or login block that performs the login.
2. Set **TOTP Verification URL** to your endpoint.
3. If the endpoint changes per run, create a workflow parameter such as `totp_url`, set the block's **TOTP Verification URL** to `{{ totp_url }}`, and pass the URL in the run's `parameters`.
```typescript TypeScript theme={null}
const body: SkyvernRunWorkflowRequest = {
workflow_id: "wpid_123",
parameters: {
totp_url: "https://your-server.com/totp-webhook",
// other workflow parameters...
},
};
```
Skyvern polls your endpoint every 10 seconds until a code is returned or the timeout is reached.
***
## Method 4: Magic links
**Best for:** Passwordless authentication systems that send one-time login links.
When a site uses magic links instead of passwords, push the link to Skyvern:
```python Python theme={null}
await client.send_totp_code(
totp_identifier="user@example.com",
content="https://portal.example.com/login?token=abc123xyz",
source="email",
)
```
```bash cURL theme={null}
curl -X POST "https://api.skyvern.com/v1/credentials/totp" \
-H "x-api-key: $SKYVERN_API_KEY" \
-H "Content-Type: application/json" \
-d '{
"totp_identifier": "user@example.com",
"content": "https://portal.example.com/login?token=abc123xyz",
"source": "email"
}'
```
Skyvern automatically detects URLs and classifies them as magic links. The automation will navigate to the link to complete authentication.
For magic link flows, structure your agent in two parts:
1. **Trigger the magic link**: Navigate to login and enter email
2. **Complete login**: Use the magic link as the starting URL for the next step
***
## Password manager TOTP
If you store TOTP secrets in Bitwarden or 1Password, Skyvern can retrieve both the password and TOTP code in a single request.
### Bitwarden
Store your TOTP secret in Bitwarden's authenticator field:
1. Open the vault item in Bitwarden
2. Click "Authenticator Key (TOTP)"
3. Enter your TOTP secret or scan the QR code
4. Skyvern retrieves both password and TOTP when using this credential
**Supported TOTP formats:**
* Raw secret: `JBSWY3DPEHPK3PXP`
* otpauth URI: `otpauth://totp/Example:user@example.com?secret=JBSWY3DPEHPK3PXP&issuer=Example`
### 1Password
Store TOTP in 1Password's one-time password field:
1. Edit the login item in 1Password
2. Add a "One-Time Password" field
3. Enter the TOTP secret or scan the QR code
4. Reference the item in your Skyvern agent
***
## Multi-field TOTP entry
Some sites split TOTP codes across multiple input fields (one digit per box). Skyvern handles this automatically:
1. Detects multi-field TOTP layouts
2. Enters the same code across all fields
3. Caches the code to prevent requesting a new one mid-entry
No special configuration needed. Skyvern's AI recognizes multi-field TOTP inputs and handles them correctly.
***
## Timeouts and polling
Skyvern waits for 2FA codes based on configurable timeouts:
| Setting | Default | Description |
| ---------------- | ---------- | -------------------------------------- |
| Polling interval | 10 seconds | How often Skyvern checks for new codes |
| Polling timeout | 15 minutes | Maximum wait time before failing |
If you're pushing codes, ensure your forwarding pipeline delivers codes within the timeout window.
***
## List recent codes
Debug your 2FA integration by listing recent codes received:
```bash theme={null}
curl -X GET "https://api.skyvern.com/v1/credentials/totp?totp_identifier=user@example.com&limit=10" \
-H "x-api-key: $SKYVERN_API_KEY"
```
**Query parameters:**
| Parameter | Description |
| ----------------- | ----------------------------------------- |
| `totp_identifier` | Filter by identifier (email, phone, etc.) |
| `workflow_run_id` | Filter by specific workflow run |
| `otp_type` | Filter by type: `totp` or `magic_link` |
| `limit` | Number of records (default 50, max 200) |
This endpoint returns historical records ordered newest first, capped by `limit`. Runtime polling still only uses unexpired codes within `TOTP_LIFESPAN_MINUTES`.
***
## Next steps
Set up your credential vault integration
Debug 2FA and login failures
Forward any previous TOTP email to the Zapier email address you created.
In Zapier, under the "Test" of the Webhooks action, send a request to test it out. If successful, you should see a "A request was sent to Webhooks by Zapier" message.
Use a virtual phone number service like [Twilio](https://www.twilio.com/en-us/docs/usage/tutorials/how-to-use-your-free-trial-account) or [Plivo](https://www.plivo.com/) to receive SMS codes and forward them to Skyvern.
Create a Twilio account and provision a phone number. This number will receive the SMS verification codes.
In your Twilio console, create a new Function that forwards incoming SMS to Skyvern's TOTP API:
```javascript theme={null}
// Twilio Function
exports.handler = async function(context, event, callback) {
const axios = require('axios');
await axios.post('https://api.skyvern.com/v1/credentials/totp', {
totp_identifier: event.To, // Your Twilio phone number
content: event.Body,
source: 'phone'
}, {
headers: {
'x-api-key': context.SKYVERN_API_KEY,
'Content-Type': 'application/json'
}
});
return callback(null, new Twilio.Response());
};
```
Add your `SKYVERN_API_KEY` as an environment variable in the Twilio Function configuration.
In your Twilio phone number settings, set the **A Message Comes In** webhook to point to your Twilio Function URL.
Send a test SMS to your Twilio number and verify the code appears in Skyvern:
```bash theme={null}
curl -X GET "https://api.skyvern.com/v1/credentials/totp?totp_identifier=YOUR_TWILIO_NUMBER" \
-H "x-api-key: $SKYVERN_API_KEY"
```
### Step 2: Start the run with a TOTP identifier
When running your login, include a `totp_identifier` that matches what you'll use when pushing codes:
```python Python theme={null}
result = await client.login(
credential_type="skyvern",
url="https://portal.example.com/login",
credential_id="cred_xyz789",
totp_identifier="user@example.com", # Must match when pushing code
)
```
```bash cURL theme={null}
curl -X POST "https://api.skyvern.com/v1/run/tasks/login" \
-H "x-api-key: $SKYVERN_API_KEY" \
-H "Content-Type: application/json" \
-d '{
"credential_type": "skyvern",
"url": "https://portal.example.com/login",
"credential_id": "cred_xyz789",
"totp_identifier": "user@example.com"
}'
```
### Step 3: Push the code when received
When the verification code arrives, push it to Skyvern:
```python Python theme={null}
await client.send_totp_code(
totp_identifier="user@example.com",
content="Your verification code is 123456", # Full email/SMS body
source="email",
)
```
```typescript TypeScript theme={null}
await client.sendTotpCode({
totp_identifier: "user@example.com",
content: "Your verification code is 123456",
source: "email",
});
```
```bash cURL theme={null}
curl -X POST "https://api.skyvern.com/v1/credentials/totp" \
-H "x-api-key: $SKYVERN_API_KEY" \
-H "Content-Type: application/json" \
-d '{
"totp_identifier": "user@example.com",
"content": "Your verification code is 123456",
"source": "email"
}'
```
If `content` is longer than 10 characters, Skyvern's AI extracts the verification code automatically. You can send the full email or SMS body without parsing it yourself.
***
## Method 3: Skyvern pulls from your endpoint
**Best for:** Environments where you control the system receiving 2FA codes and can expose them via an HTTP endpoint.
Instead of pushing codes to Skyvern, you implement an endpoint that Skyvern polls until a code is available.
For saved workflows or agents, configure the endpoint on the specific browser block that can encounter 2FA. Use the block's **TOTP Verification URL** field, or set that field to a workflow parameter such as `{{ totp_url }}` and pass the value in `parameters` when starting the run.
Passing `totp_url` only at the top level of a workflow run does not automatically populate every block. If the block's **TOTP Verification URL** is empty, that block will not call your endpoint.
### Step 1: Implement the endpoint
Your endpoint must accept POST requests and return the verification code:
**Request from Skyvern:**
```http theme={null}
POST https://your-server.com/totp-webhook
x-skyvern-signature:
Content-Type: application/json
{
"task_id": "tsk_123456"
}
```
**Expected response:**
```json theme={null}
{
"verification_code": "123456"
}
```
### Step 2: Verify request signatures
Skyvern signs all requests using HMAC-SHA256 with your API key. Verify the signature to ensure requests are authentic:
```python theme={null}
import hmac
import hashlib
def verify_skyvern_request(request, api_key: str) -> bool:
signature = request.headers.get("x-skyvern-signature")
payload = request.body # bytes
expected = hmac.new(
api_key.encode("utf-8"),
msg=payload,
digestmod=hashlib.sha256
).hexdigest()
return hmac.compare_digest(signature, expected)
```
### Step 3: Configure the login or block
For a one-off login task, pass `totp_url` in the login request:
```python Python theme={null}
result = await client.login(
credential_type="skyvern",
url="https://portal.example.com/login",
credential_id="cred_xyz789",
totp_url="https://your-server.com/totp-webhook",
)
```
```bash cURL theme={null}
curl -X POST "https://api.skyvern.com/v1/run/tasks/login" \
-H "x-api-key: $SKYVERN_API_KEY" \
-H "Content-Type: application/json" \
-d '{
"credential_type": "skyvern",
"url": "https://portal.example.com/login",
"credential_id": "cred_xyz789",
"totp_url": "https://your-server.com/totp-webhook"
}'
```
For a saved workflow or agent, configure the block that may see the 2FA prompt:
1. Open the browser, action, file download, or login block that performs the login.
2. Set **TOTP Verification URL** to your endpoint.
3. If the endpoint changes per run, create a workflow parameter such as `totp_url`, set the block's **TOTP Verification URL** to `{{ totp_url }}`, and pass the URL in the run's `parameters`.
```typescript TypeScript theme={null}
const body: SkyvernRunWorkflowRequest = {
workflow_id: "wpid_123",
parameters: {
totp_url: "https://your-server.com/totp-webhook",
// other workflow parameters...
},
};
```
Skyvern polls your endpoint every 10 seconds until a code is returned or the timeout is reached.
***
## Method 4: Magic links
**Best for:** Passwordless authentication systems that send one-time login links.
When a site uses magic links instead of passwords, push the link to Skyvern:
```python Python theme={null}
await client.send_totp_code(
totp_identifier="user@example.com",
content="https://portal.example.com/login?token=abc123xyz",
source="email",
)
```
```bash cURL theme={null}
curl -X POST "https://api.skyvern.com/v1/credentials/totp" \
-H "x-api-key: $SKYVERN_API_KEY" \
-H "Content-Type: application/json" \
-d '{
"totp_identifier": "user@example.com",
"content": "https://portal.example.com/login?token=abc123xyz",
"source": "email"
}'
```
Skyvern automatically detects URLs and classifies them as magic links. The automation will navigate to the link to complete authentication.
For magic link flows, structure your agent in two parts:
1. **Trigger the magic link**: Navigate to login and enter email
2. **Complete login**: Use the magic link as the starting URL for the next step
***
## Password manager TOTP
If you store TOTP secrets in Bitwarden or 1Password, Skyvern can retrieve both the password and TOTP code in a single request.
### Bitwarden
Store your TOTP secret in Bitwarden's authenticator field:
1. Open the vault item in Bitwarden
2. Click "Authenticator Key (TOTP)"
3. Enter your TOTP secret or scan the QR code
4. Skyvern retrieves both password and TOTP when using this credential
**Supported TOTP formats:**
* Raw secret: `JBSWY3DPEHPK3PXP`
* otpauth URI: `otpauth://totp/Example:user@example.com?secret=JBSWY3DPEHPK3PXP&issuer=Example`
### 1Password
Store TOTP in 1Password's one-time password field:
1. Edit the login item in 1Password
2. Add a "One-Time Password" field
3. Enter the TOTP secret or scan the QR code
4. Reference the item in your Skyvern agent
***
## Multi-field TOTP entry
Some sites split TOTP codes across multiple input fields (one digit per box). Skyvern handles this automatically:
1. Detects multi-field TOTP layouts
2. Enters the same code across all fields
3. Caches the code to prevent requesting a new one mid-entry
No special configuration needed. Skyvern's AI recognizes multi-field TOTP inputs and handles them correctly.
***
## Timeouts and polling
Skyvern waits for 2FA codes based on configurable timeouts:
| Setting | Default | Description |
| ---------------- | ---------- | -------------------------------------- |
| Polling interval | 10 seconds | How often Skyvern checks for new codes |
| Polling timeout | 15 minutes | Maximum wait time before failing |
If you're pushing codes, ensure your forwarding pipeline delivers codes within the timeout window.
***
## List recent codes
Debug your 2FA integration by listing recent codes received:
```bash theme={null}
curl -X GET "https://api.skyvern.com/v1/credentials/totp?totp_identifier=user@example.com&limit=10" \
-H "x-api-key: $SKYVERN_API_KEY"
```
**Query parameters:**
| Parameter | Description |
| ----------------- | ----------------------------------------- |
| `totp_identifier` | Filter by identifier (email, phone, etc.) |
| `workflow_run_id` | Filter by specific workflow run |
| `otp_type` | Filter by type: `totp` or `magic_link` |
| `limit` | Number of records (default 50, max 200) |
This endpoint returns historical records ordered newest first, capped by `limit`. Runtime polling still only uses unexpired codes within `TOTP_LIFESPAN_MINUTES`.
***
## Next steps
Set up your credential vault integration
Debug 2FA and login failures