> ## Documentation Index
> Fetch the complete documentation index at: https://skyvern.com/docs/llms.txt
> Use this file to discover all available pages before exploring further.
# Your First Task
> Follow a step-by-step tutorial to run your first browser automation task in the Skyvern Cloud UI, from writing a prompt to viewing extracted results.
Let's run a real automation. You'll tell Skyvern to visit a website, extract data, and return it as JSON. Then watch the entire thing happen live.
## Step 1: Write your prompt
Open [app.skyvern.com](https://app.skyvern.com) and you'll land on the **Discover** page.
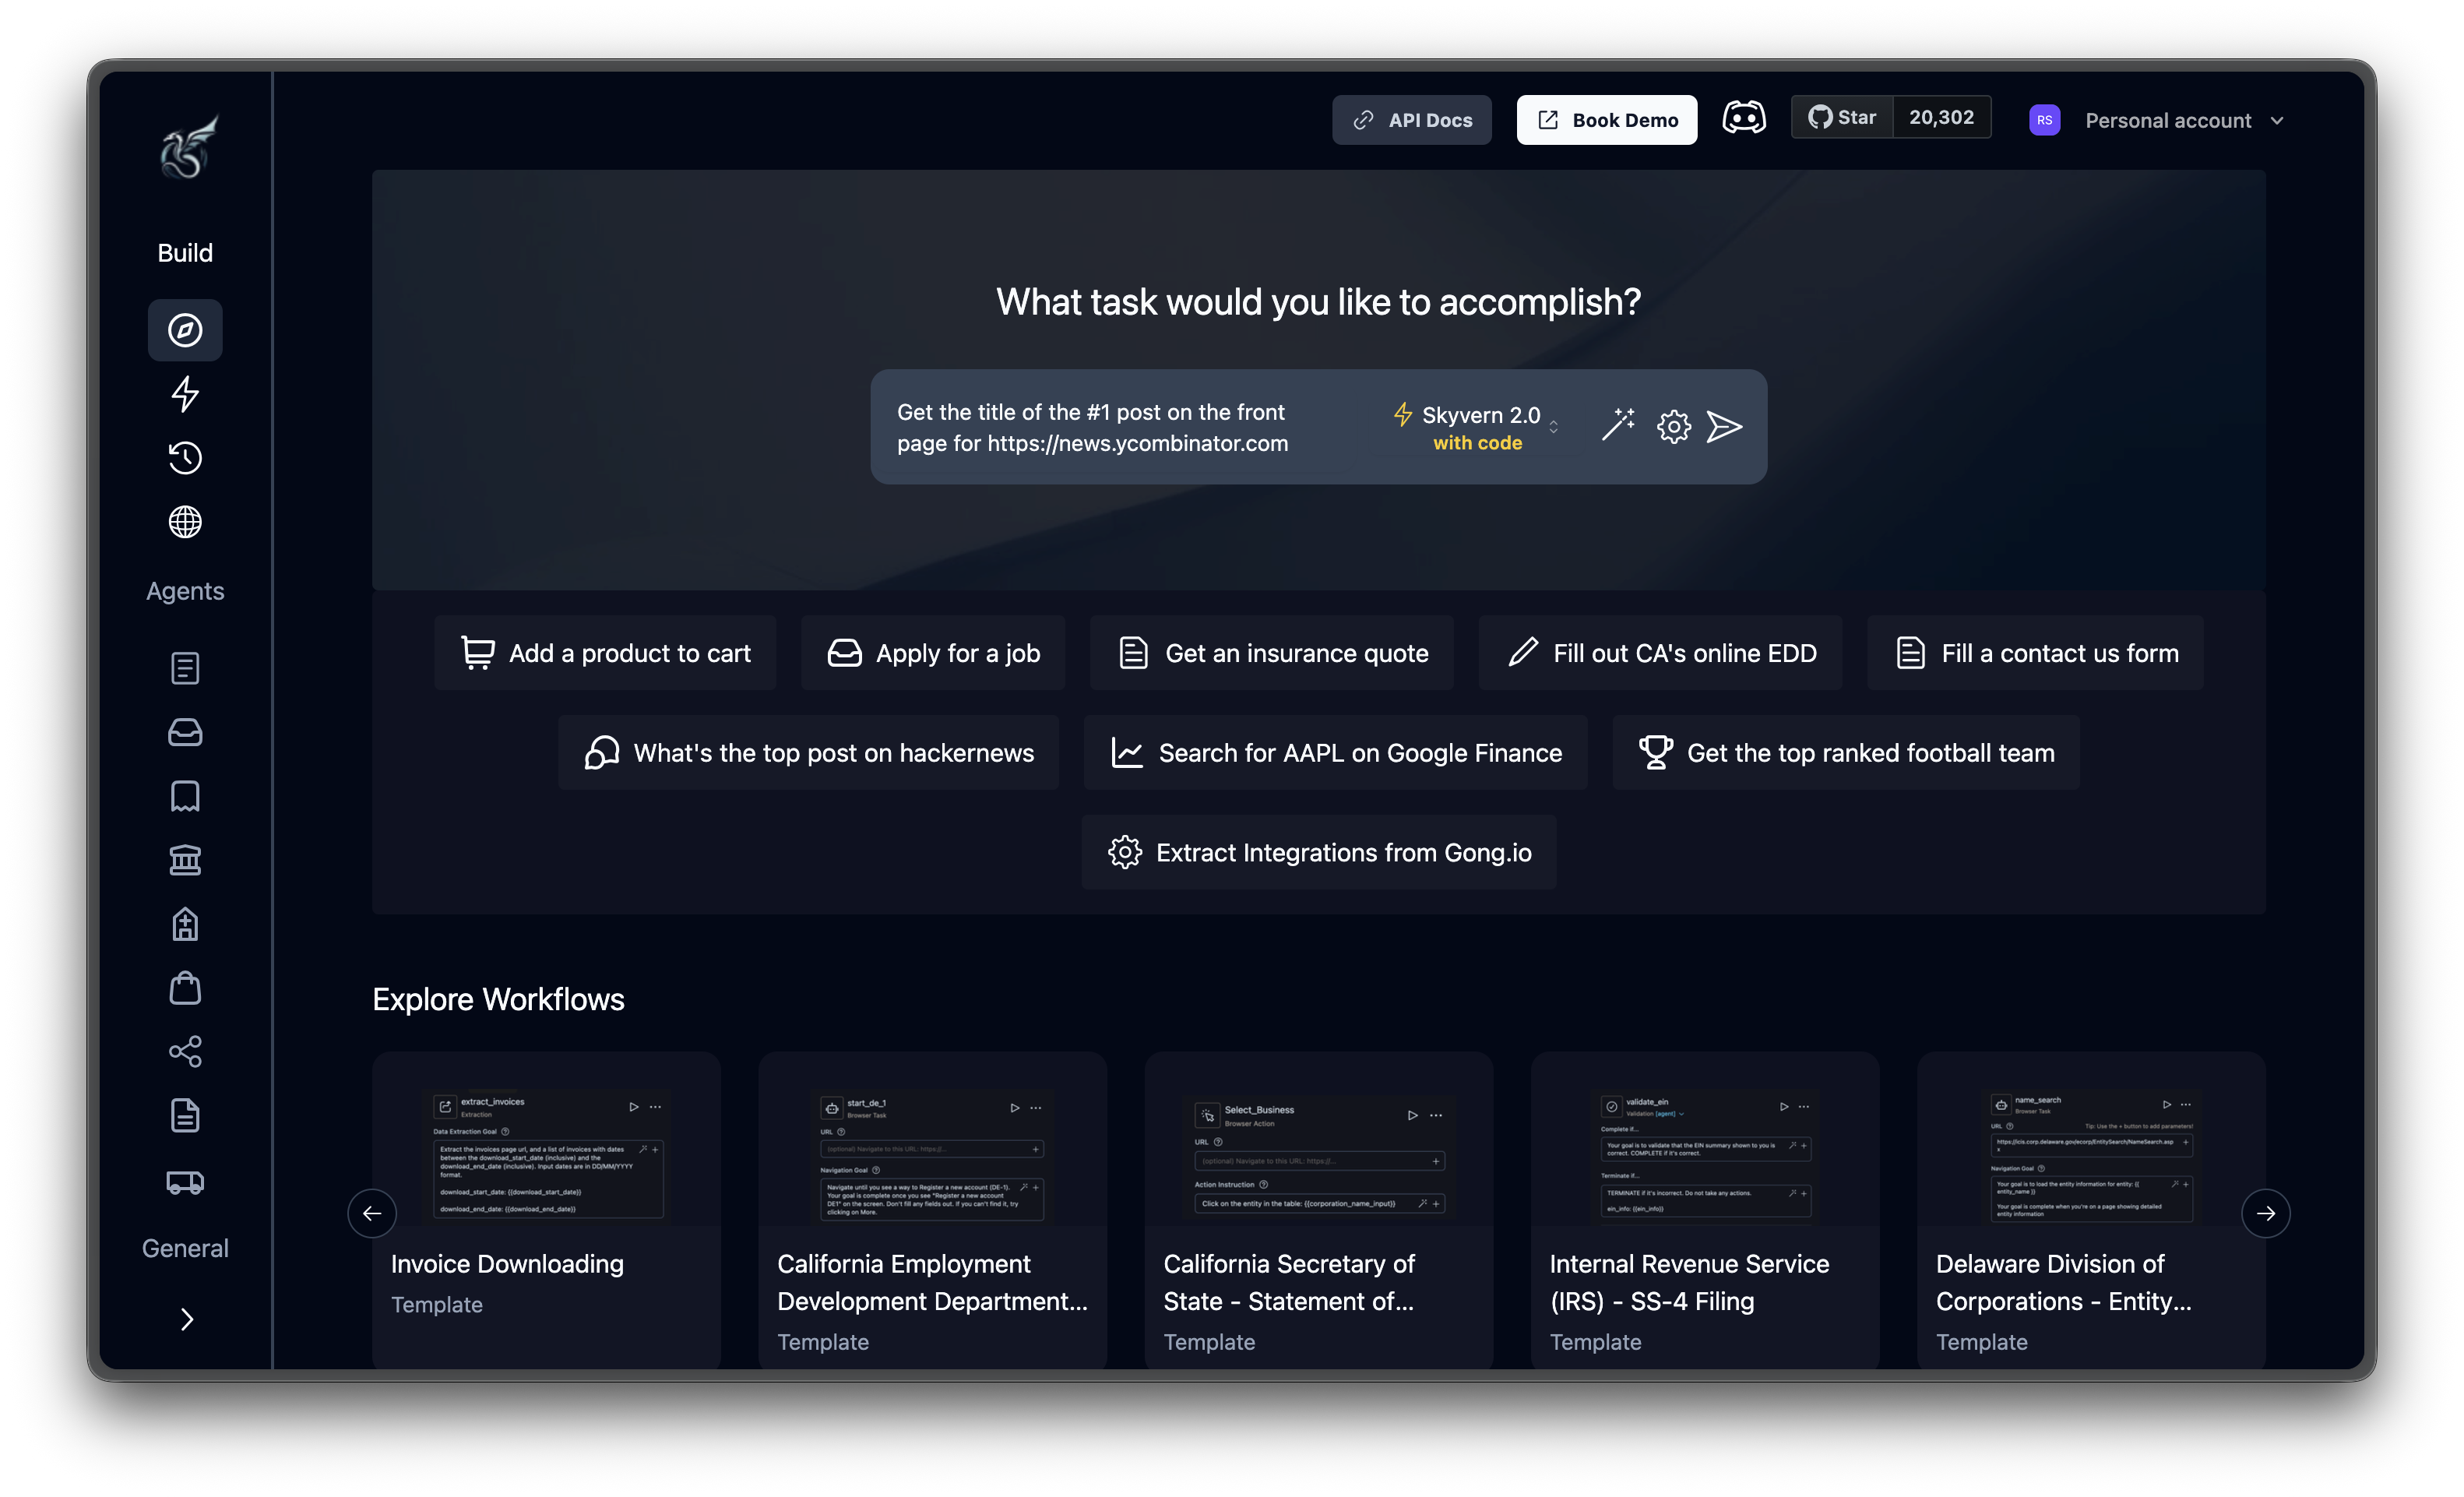 The Discover page has a single input field. Type your instructions and include the target URL in the same prompt. For this example, enter:
```
Get the title of the #1 post on the front page for https://news.ycombinator.com
```
That's it. Skyvern parses the URL and figures out how to navigate the page and extract the data.
Below the input, you'll see quick-action chips like "Add a product to cart" and "What's the top post on hackernews". Click any of these to try a pre-filled example instead.
The more specific your prompt, the better. "Get the title of the #1 post" works much better than "get some data." Include the exact fields you want, what success looks like, and any constraints.
## Step 2: Create and run the agent
Click the **send button** (arrow icon to the right of the input). Skyvern generates an agent from your prompt using the default Skyvern 1.0 task engine and opens it in the agent editor. Click **Run** in the top right, confirm the parameters, then click **Run agent** to start execution.
Click the **gear icon** next to send to configure additional options before running:
| Setting | What it does |
| -------------------------- | ----------------------------------------------------------------- |
| **Webhook Callback URL** | Endpoint to receive the extracted data when the run completes |
| **Proxy Location** | Route Skyvern through one of the available proxies |
| **Browser Session ID** | Reuse a persistent browser session to keep login state |
| **CDP Address** | Connect to your own browser via Chrome DevTools Protocol |
| **2FA Identifier** | Identifier for a 2FA code to handle two-factor auth automatically |
| **Extra HTTP Headers** | Custom HTTP request headers (dict format) |
| **Generate Script** | Auto-generate reusable scripts from a successful run |
| **Publish Agent** | Create an agent alongside this task run |
| **Max Steps Override** | Cap the number of steps the AI can take |
| **Data Schema** | Define structured JSON output format |
| **Max Screenshot Scrolls** | Limit scrolls for post-action screenshots (default: 3) |
These are all optional. The defaults work for most tasks.
## Step 3: Watch the live browser
This is where it gets interesting. Once the task starts, you'll see the run detail page with a live view of the browser:
The Discover page has a single input field. Type your instructions and include the target URL in the same prompt. For this example, enter:
```
Get the title of the #1 post on the front page for https://news.ycombinator.com
```
That's it. Skyvern parses the URL and figures out how to navigate the page and extract the data.
Below the input, you'll see quick-action chips like "Add a product to cart" and "What's the top post on hackernews". Click any of these to try a pre-filled example instead.
The more specific your prompt, the better. "Get the title of the #1 post" works much better than "get some data." Include the exact fields you want, what success looks like, and any constraints.
## Step 2: Create and run the agent
Click the **send button** (arrow icon to the right of the input). Skyvern generates an agent from your prompt using the default Skyvern 1.0 task engine and opens it in the agent editor. Click **Run** in the top right, confirm the parameters, then click **Run agent** to start execution.
Click the **gear icon** next to send to configure additional options before running:
| Setting | What it does |
| -------------------------- | ----------------------------------------------------------------- |
| **Webhook Callback URL** | Endpoint to receive the extracted data when the run completes |
| **Proxy Location** | Route Skyvern through one of the available proxies |
| **Browser Session ID** | Reuse a persistent browser session to keep login state |
| **CDP Address** | Connect to your own browser via Chrome DevTools Protocol |
| **2FA Identifier** | Identifier for a 2FA code to handle two-factor auth automatically |
| **Extra HTTP Headers** | Custom HTTP request headers (dict format) |
| **Generate Script** | Auto-generate reusable scripts from a successful run |
| **Publish Agent** | Create an agent alongside this task run |
| **Max Steps Override** | Cap the number of steps the AI can take |
| **Data Schema** | Define structured JSON output format |
| **Max Screenshot Scrolls** | Limit scrolls for post-action screenshots (default: 3) |
These are all optional. The defaults work for most tasks.
## Step 3: Watch the live browser
This is where it gets interesting. Once the task starts, you'll see the run detail page with a live view of the browser:
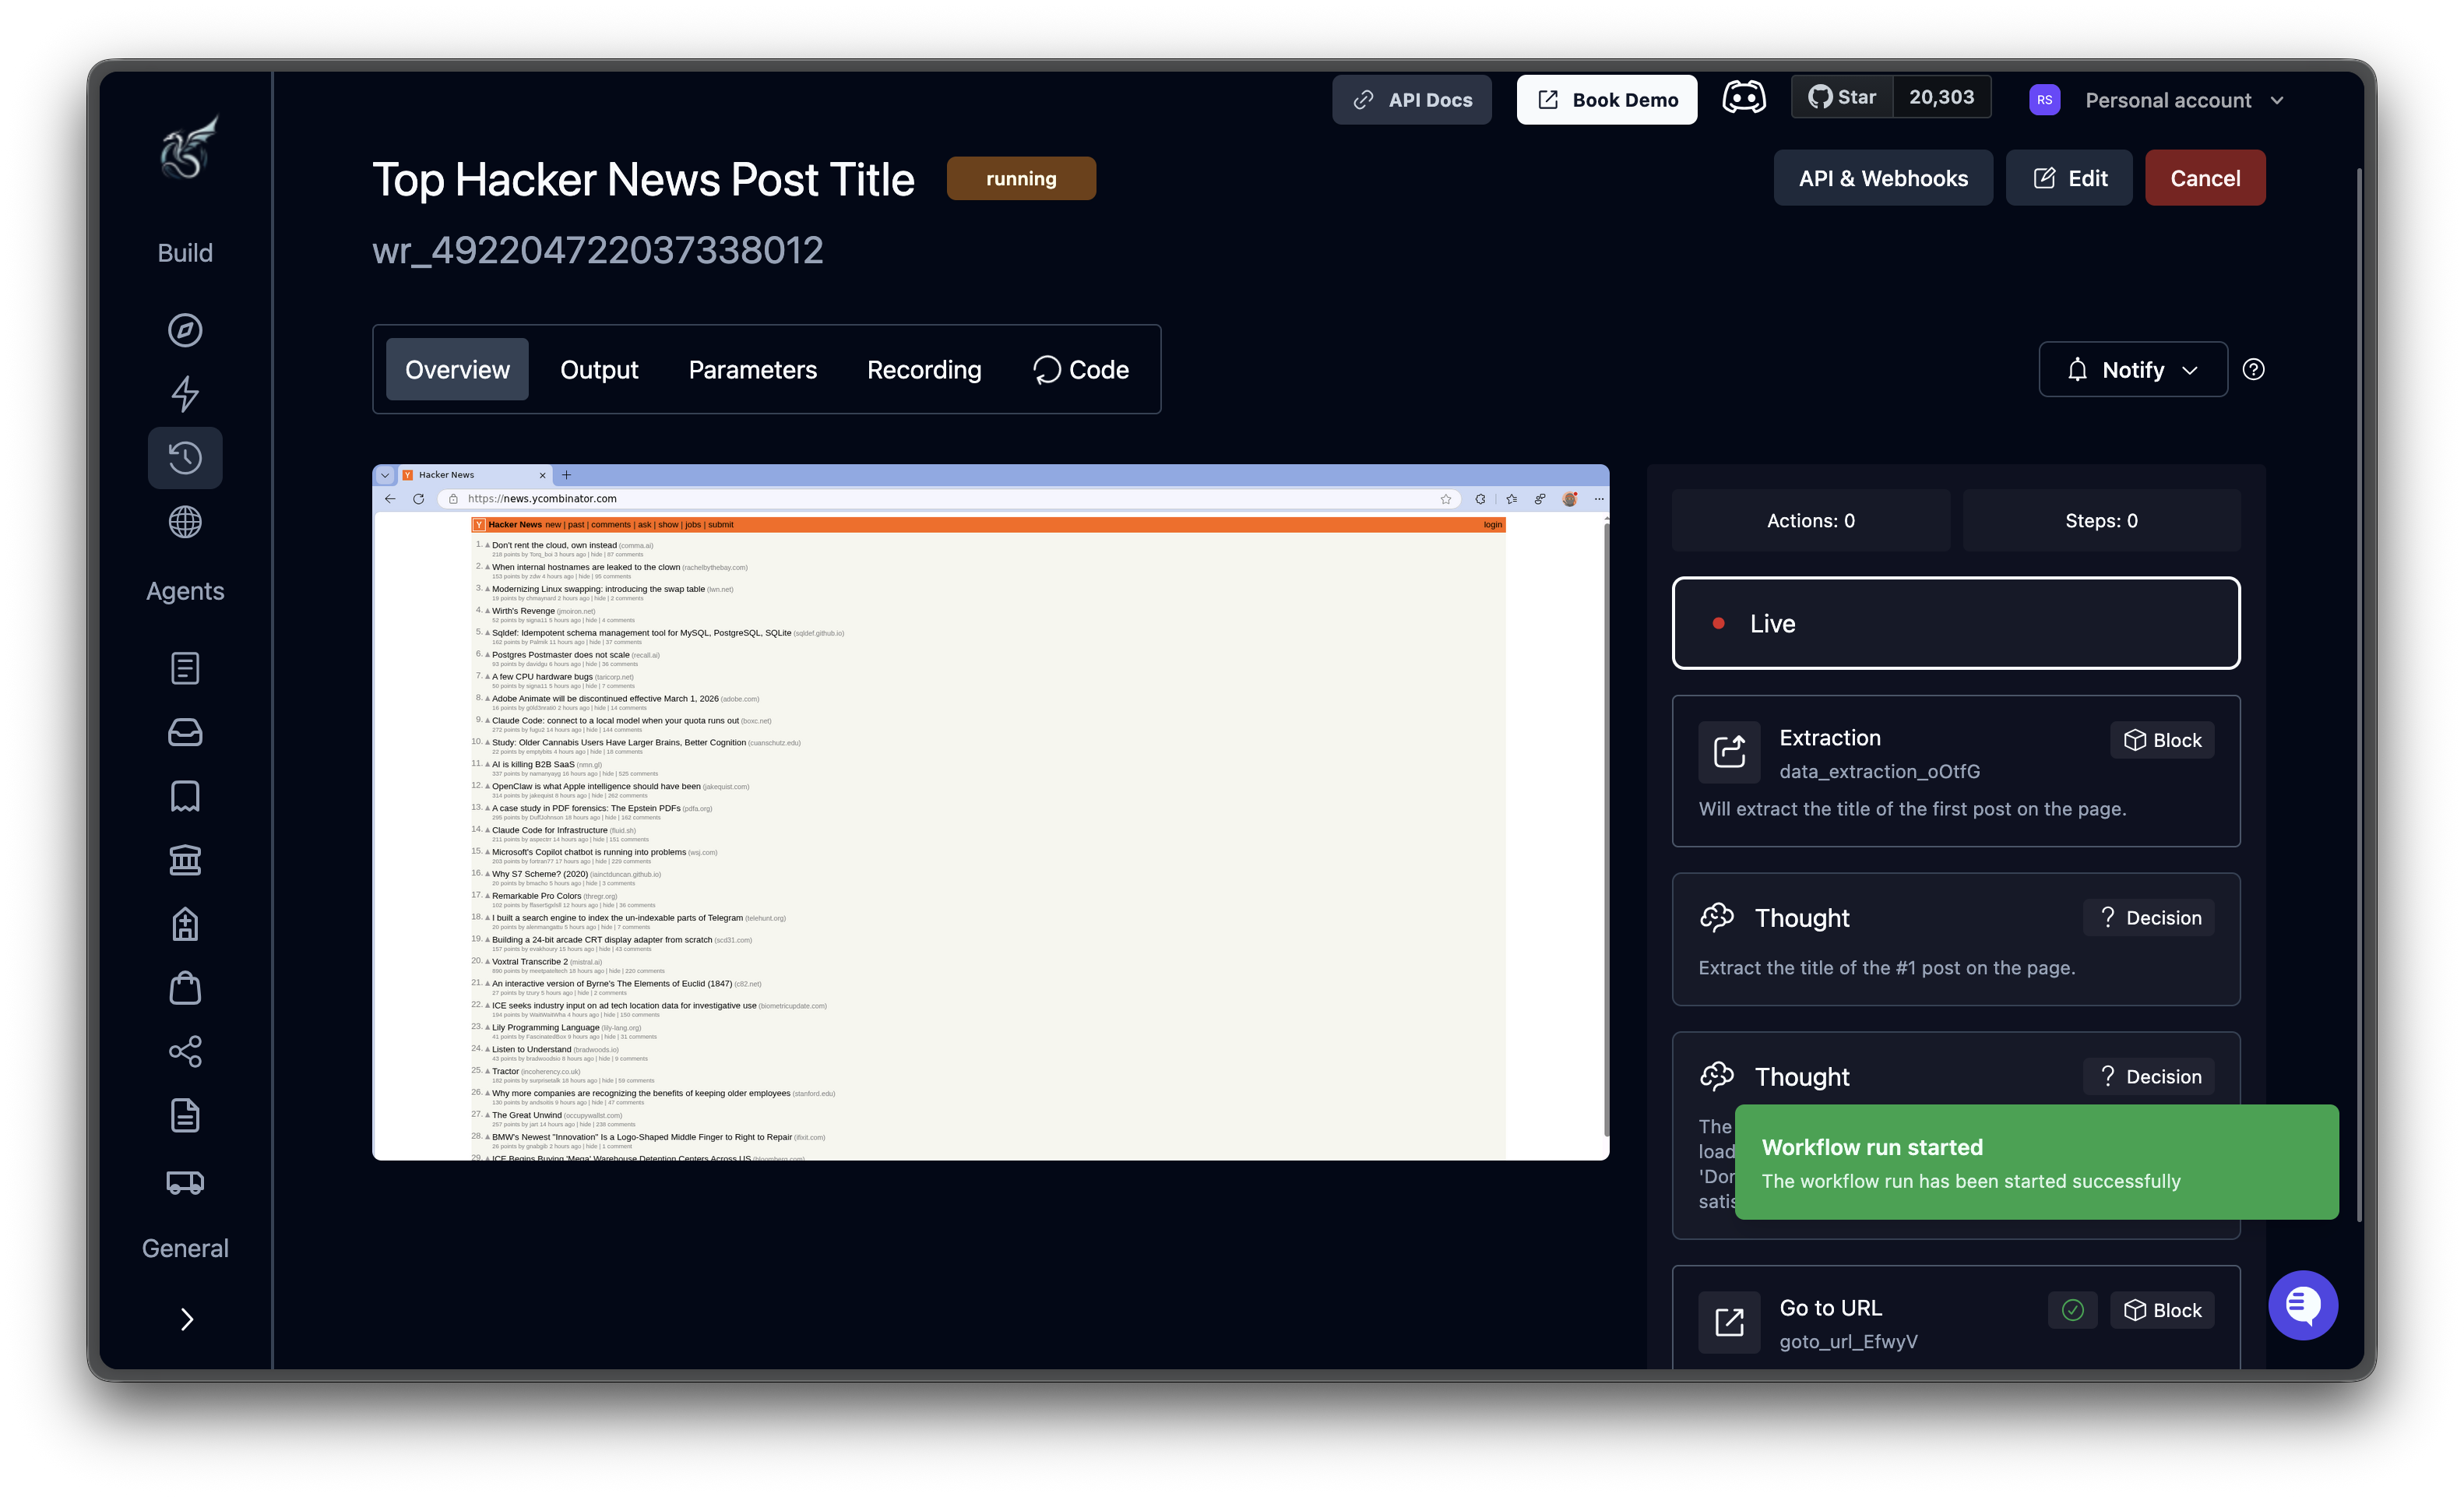 On the left, a **live browser view**. You'll see pages load, elements highlight, and actions fire.
On the right, the **agent log**. A running stream of the AI's Thoughts, Decisions, and block executions. If something goes wrong, this is where you'll figure out why.
## Step 4: Review the results
When the task finishes, the status badge flips to **completed** and the extracted data appears at the top of the page.
On the left, a **live browser view**. You'll see pages load, elements highlight, and actions fire.
On the right, the **agent log**. A running stream of the AI's Thoughts, Decisions, and block executions. If something goes wrong, this is where you'll figure out why.
## Step 4: Review the results
When the task finishes, the status badge flips to **completed** and the extracted data appears at the top of the page.
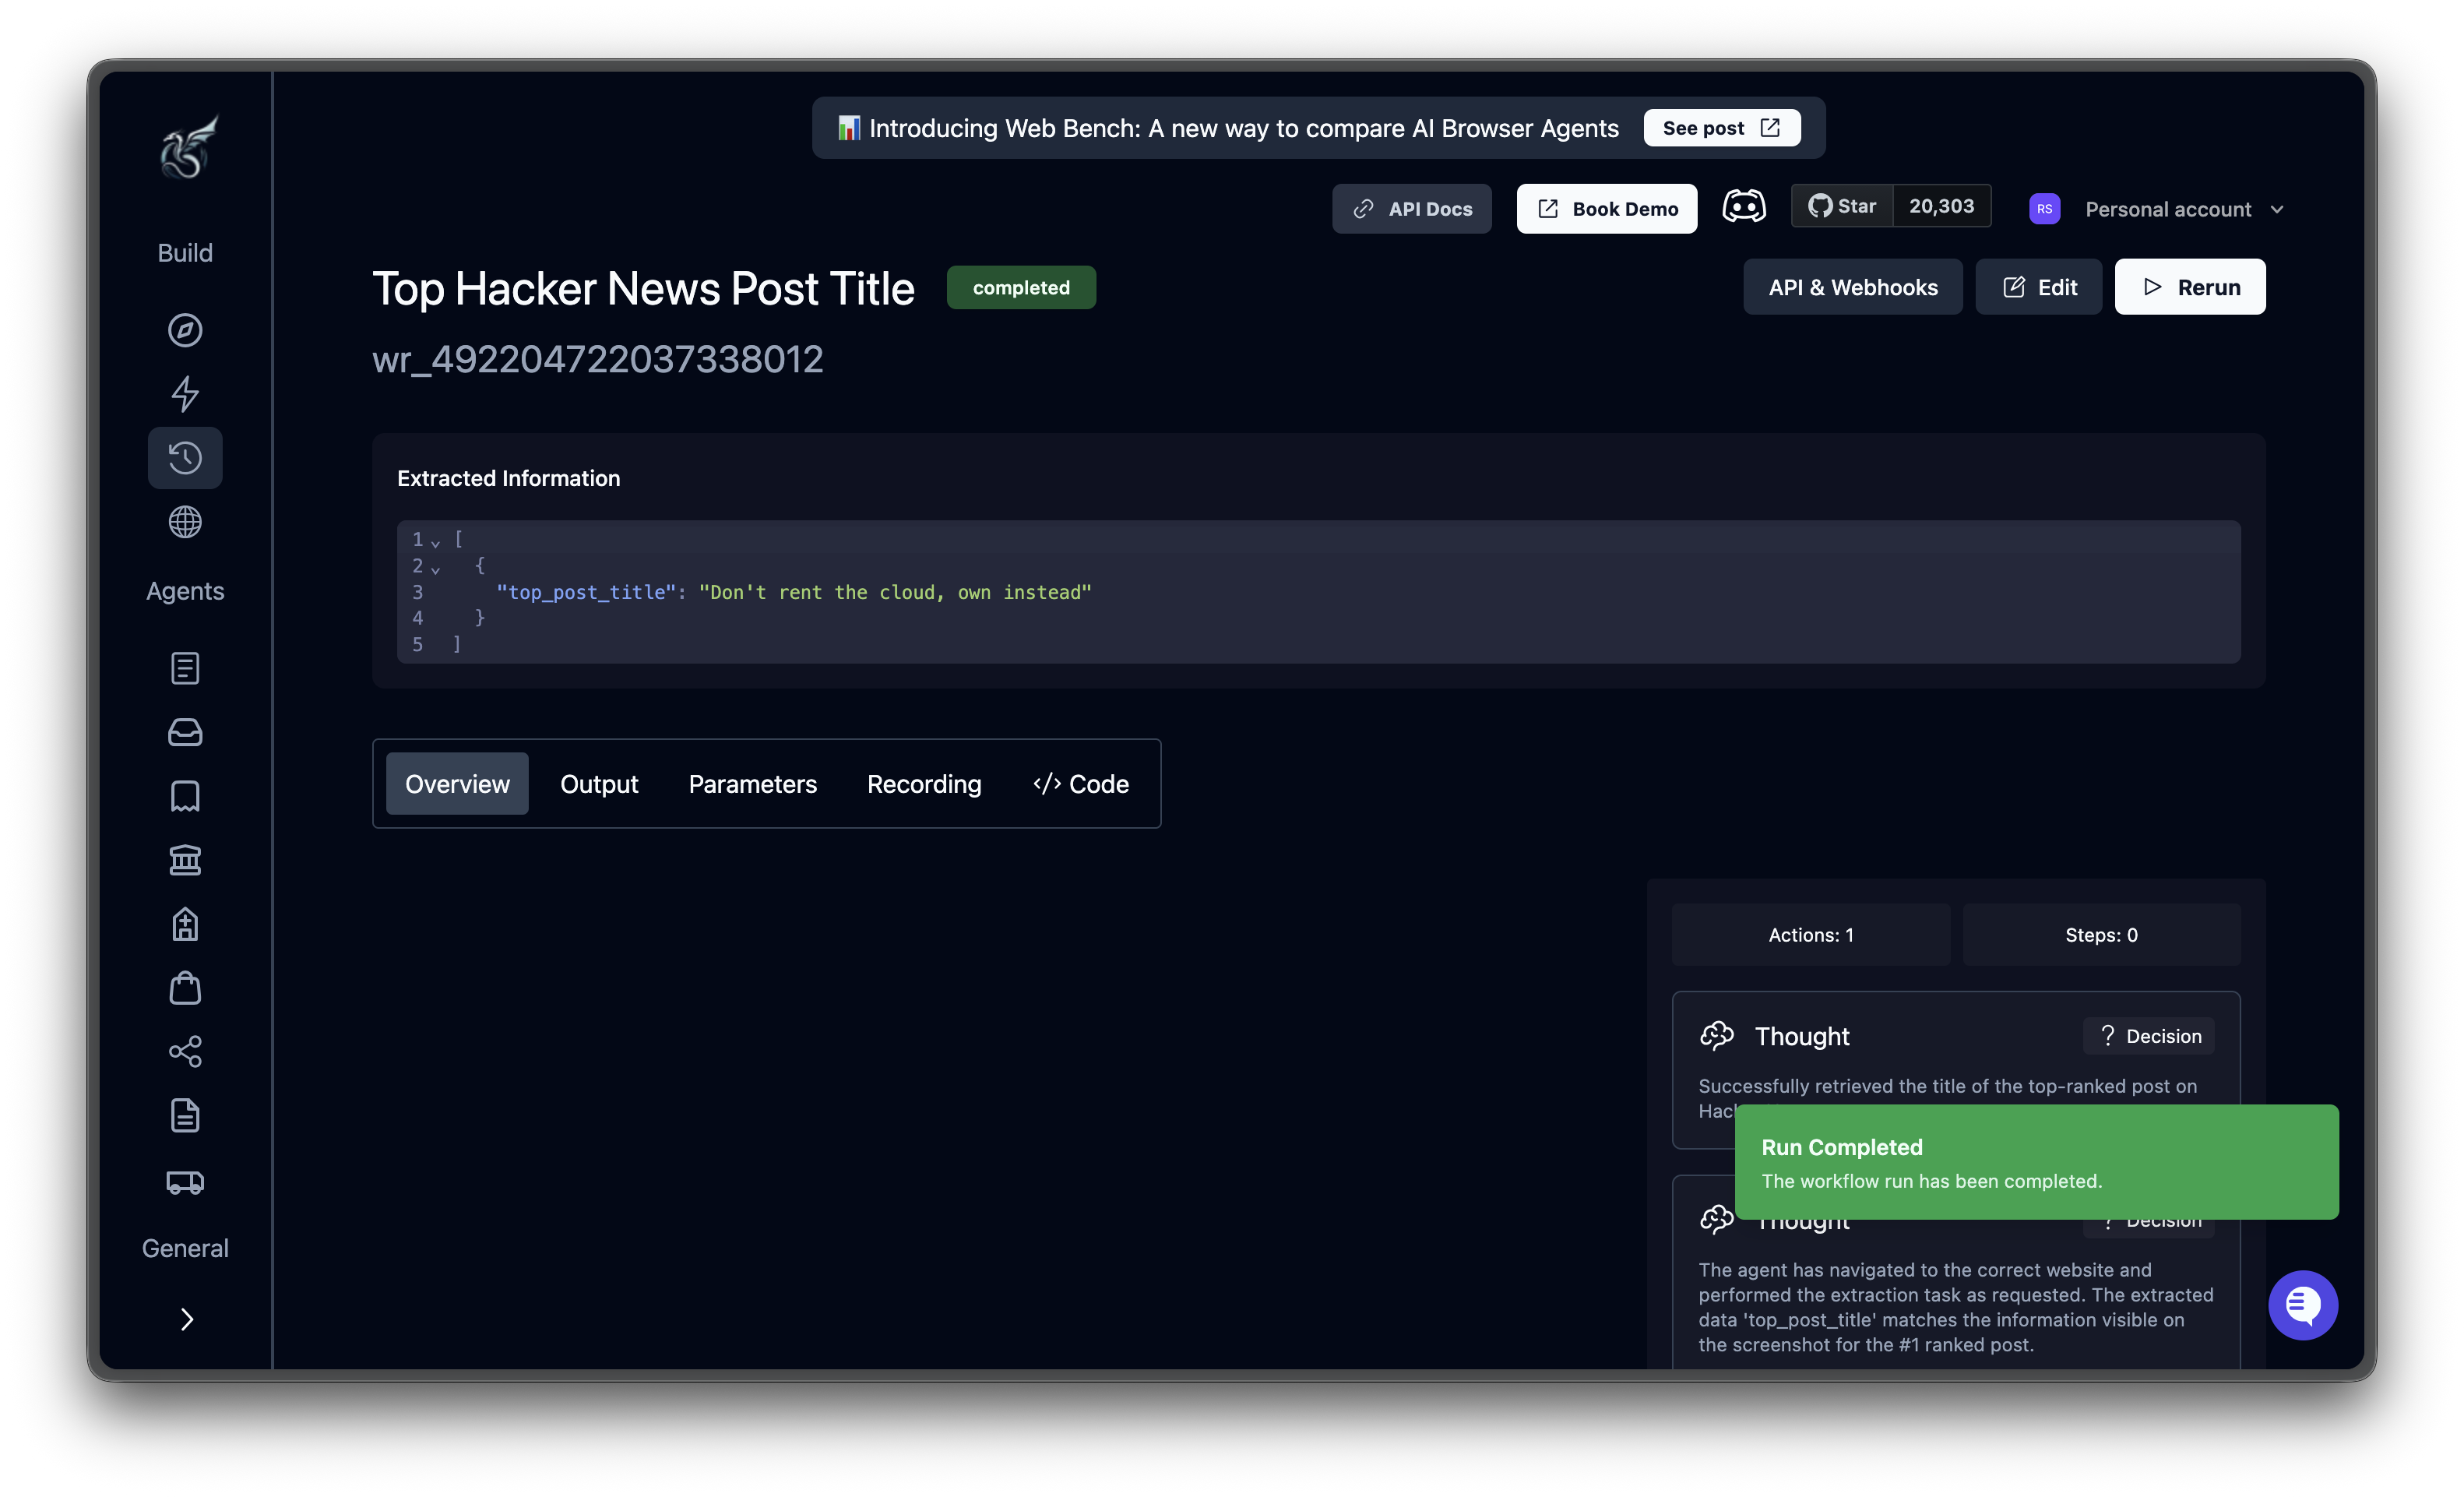 ### Extracted data
The **Extracted Information** block shows your results as structured JSON:
```json theme={null}
[
{
"top_post_title": "Don't rent the cloud, own instead"
}
]
```
Your result will differ, since the #1 post changes constantly. The structure is what matters.
The agent log on the right confirms what happened. You'll see a final Thought summarizing the result.
### Tabs
Below the extracted data, five tabs give you different views of the run:
* **Overview**: The AI's reasoning timeline alongside browser screenshots. Each Thought, Block, and Action card shows what the agent saw and why it acted.
* **Output**: The complete JSON output and any downloaded files.
* **Parameters**: The exact configuration that was submitted (URL, prompt, engine, schema). Useful for reproducing or tweaking the run.
* **Recording**: Full video replay of the browser session, start to finish.
* **Code**: Auto-generated Python code to reproduce this task via the API or SDK.
## Try something bigger
Now that you've seen the basic flow, here are a few ideas to try next:
* **Fill a form**: Point Skyvern at a contact form and tell it what to enter in each field
* **Compare prices**: Extract product names and prices from an e-commerce page using a data schema
* **Navigate a flow**: Build an agent to walk through a multi-page checkout or signup process
* **Use an Agent template**: Check the **Agents** section in the sidebar for pre-built automations you can run instantly
***
## Next steps
Trigger automations programmatically with the Skyvern API
Understand tasks, agents, and other building blocks
### Extracted data
The **Extracted Information** block shows your results as structured JSON:
```json theme={null}
[
{
"top_post_title": "Don't rent the cloud, own instead"
}
]
```
Your result will differ, since the #1 post changes constantly. The structure is what matters.
The agent log on the right confirms what happened. You'll see a final Thought summarizing the result.
### Tabs
Below the extracted data, five tabs give you different views of the run:
* **Overview**: The AI's reasoning timeline alongside browser screenshots. Each Thought, Block, and Action card shows what the agent saw and why it acted.
* **Output**: The complete JSON output and any downloaded files.
* **Parameters**: The exact configuration that was submitted (URL, prompt, engine, schema). Useful for reproducing or tweaking the run.
* **Recording**: Full video replay of the browser session, start to finish.
* **Code**: Auto-generated Python code to reproduce this task via the API or SDK.
## Try something bigger
Now that you've seen the basic flow, here are a few ideas to try next:
* **Fill a form**: Point Skyvern at a contact form and tell it what to enter in each field
* **Compare prices**: Extract product names and prices from an e-commerce page using a data schema
* **Navigate a flow**: Build an agent to walk through a multi-page checkout or signup process
* **Use an Agent template**: Check the **Agents** section in the sidebar for pre-built automations you can run instantly
***
## Next steps
Trigger automations programmatically with the Skyvern API
Understand tasks, agents, and other building blocks