> ## Documentation Index
> Fetch the complete documentation index at: https://skyvern.com/docs/llms.txt
> Use this file to discover all available pages before exploring further.
# Schedule an Agent
> Set up recurring cron-based agent schedules in the Skyvern Cloud UI, including creating, editing, pausing, and deleting schedules with timezone support.
You can schedule any agent built in the Cloud UI to run automatically on a recurring basis. Schedules are configured with a cron expression and timezone, and Skyvern triggers the agent at each interval.
This page covers scheduling through the Cloud UI. You can also create schedules programmatically via the SDK or API. See [Run from Code](/cloud/building-agents/run-from-code) for the code approach.
Schedules are created as **active** by default: they start triggering runs immediately after creation.
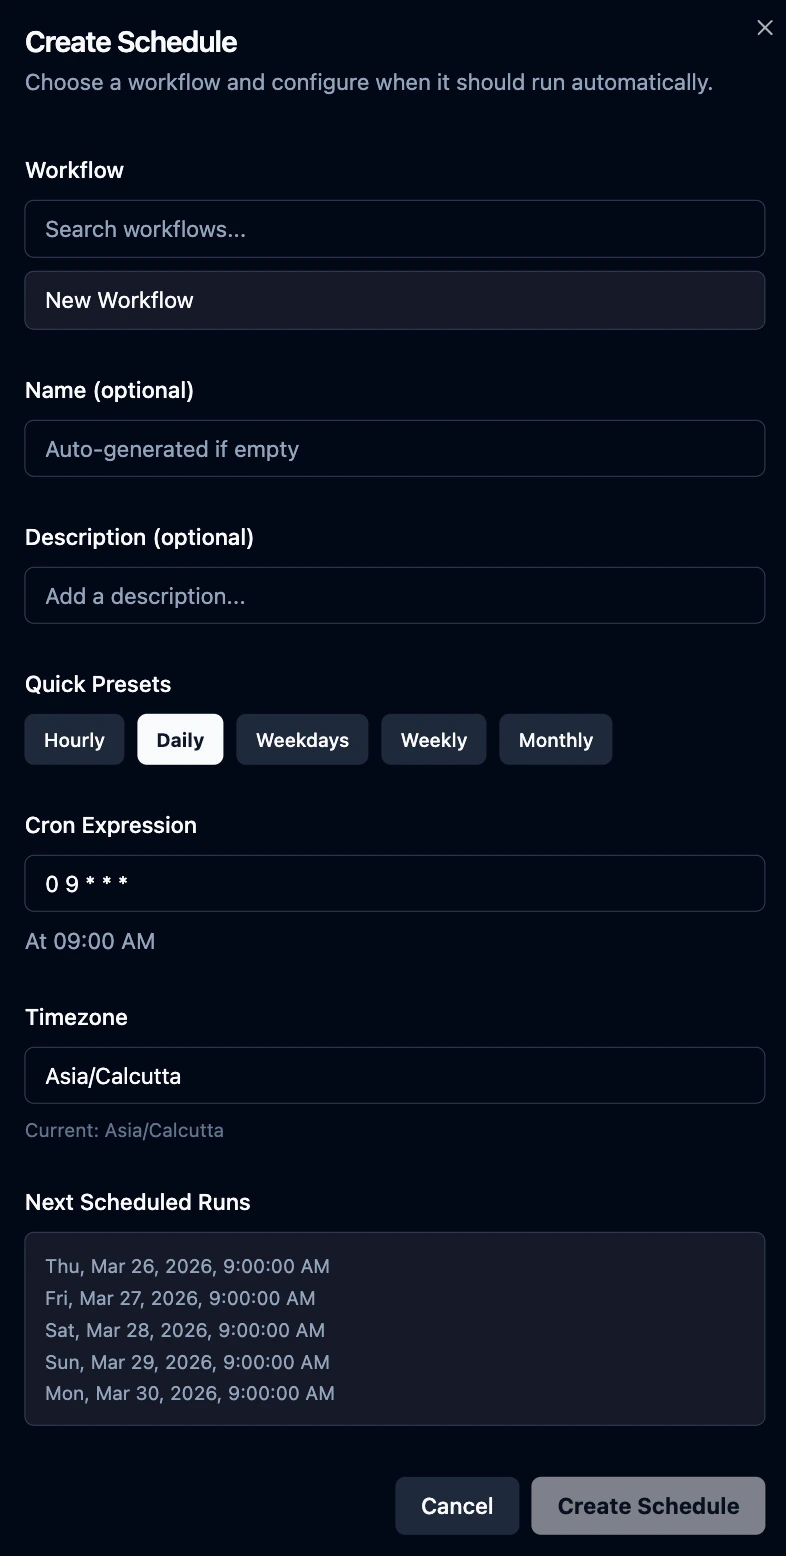
When creating a schedule you'll fill in these fields:
* **Agent** (required): The agent to run. When creating from the agent editor this is pre-selected.
* **Cron Expression** (required): A standard 5-field cron expression that defines how often the agent runs (e.g., `0 9 * * 1-5` for every weekday at 9 AM). The UI validates the expression in real time and shows a human-readable translation. Quick presets are available for common patterns like hourly, daily, and weekly.
* **Timezone** (required): The IANA timezone the cron expression is evaluated in (e.g., `America/New_York`). Defaults to your browser's local timezone. The dropdown is searchable by city name.
* **Name**: A human-readable label to identify this schedule in the table and run history.
* **Description**: Optional notes about what this schedule does or why it exists.
The minimum interval between runs is **5 minutes**. Expressions that resolve to shorter intervals are rejected.
***
## Creating a schedule
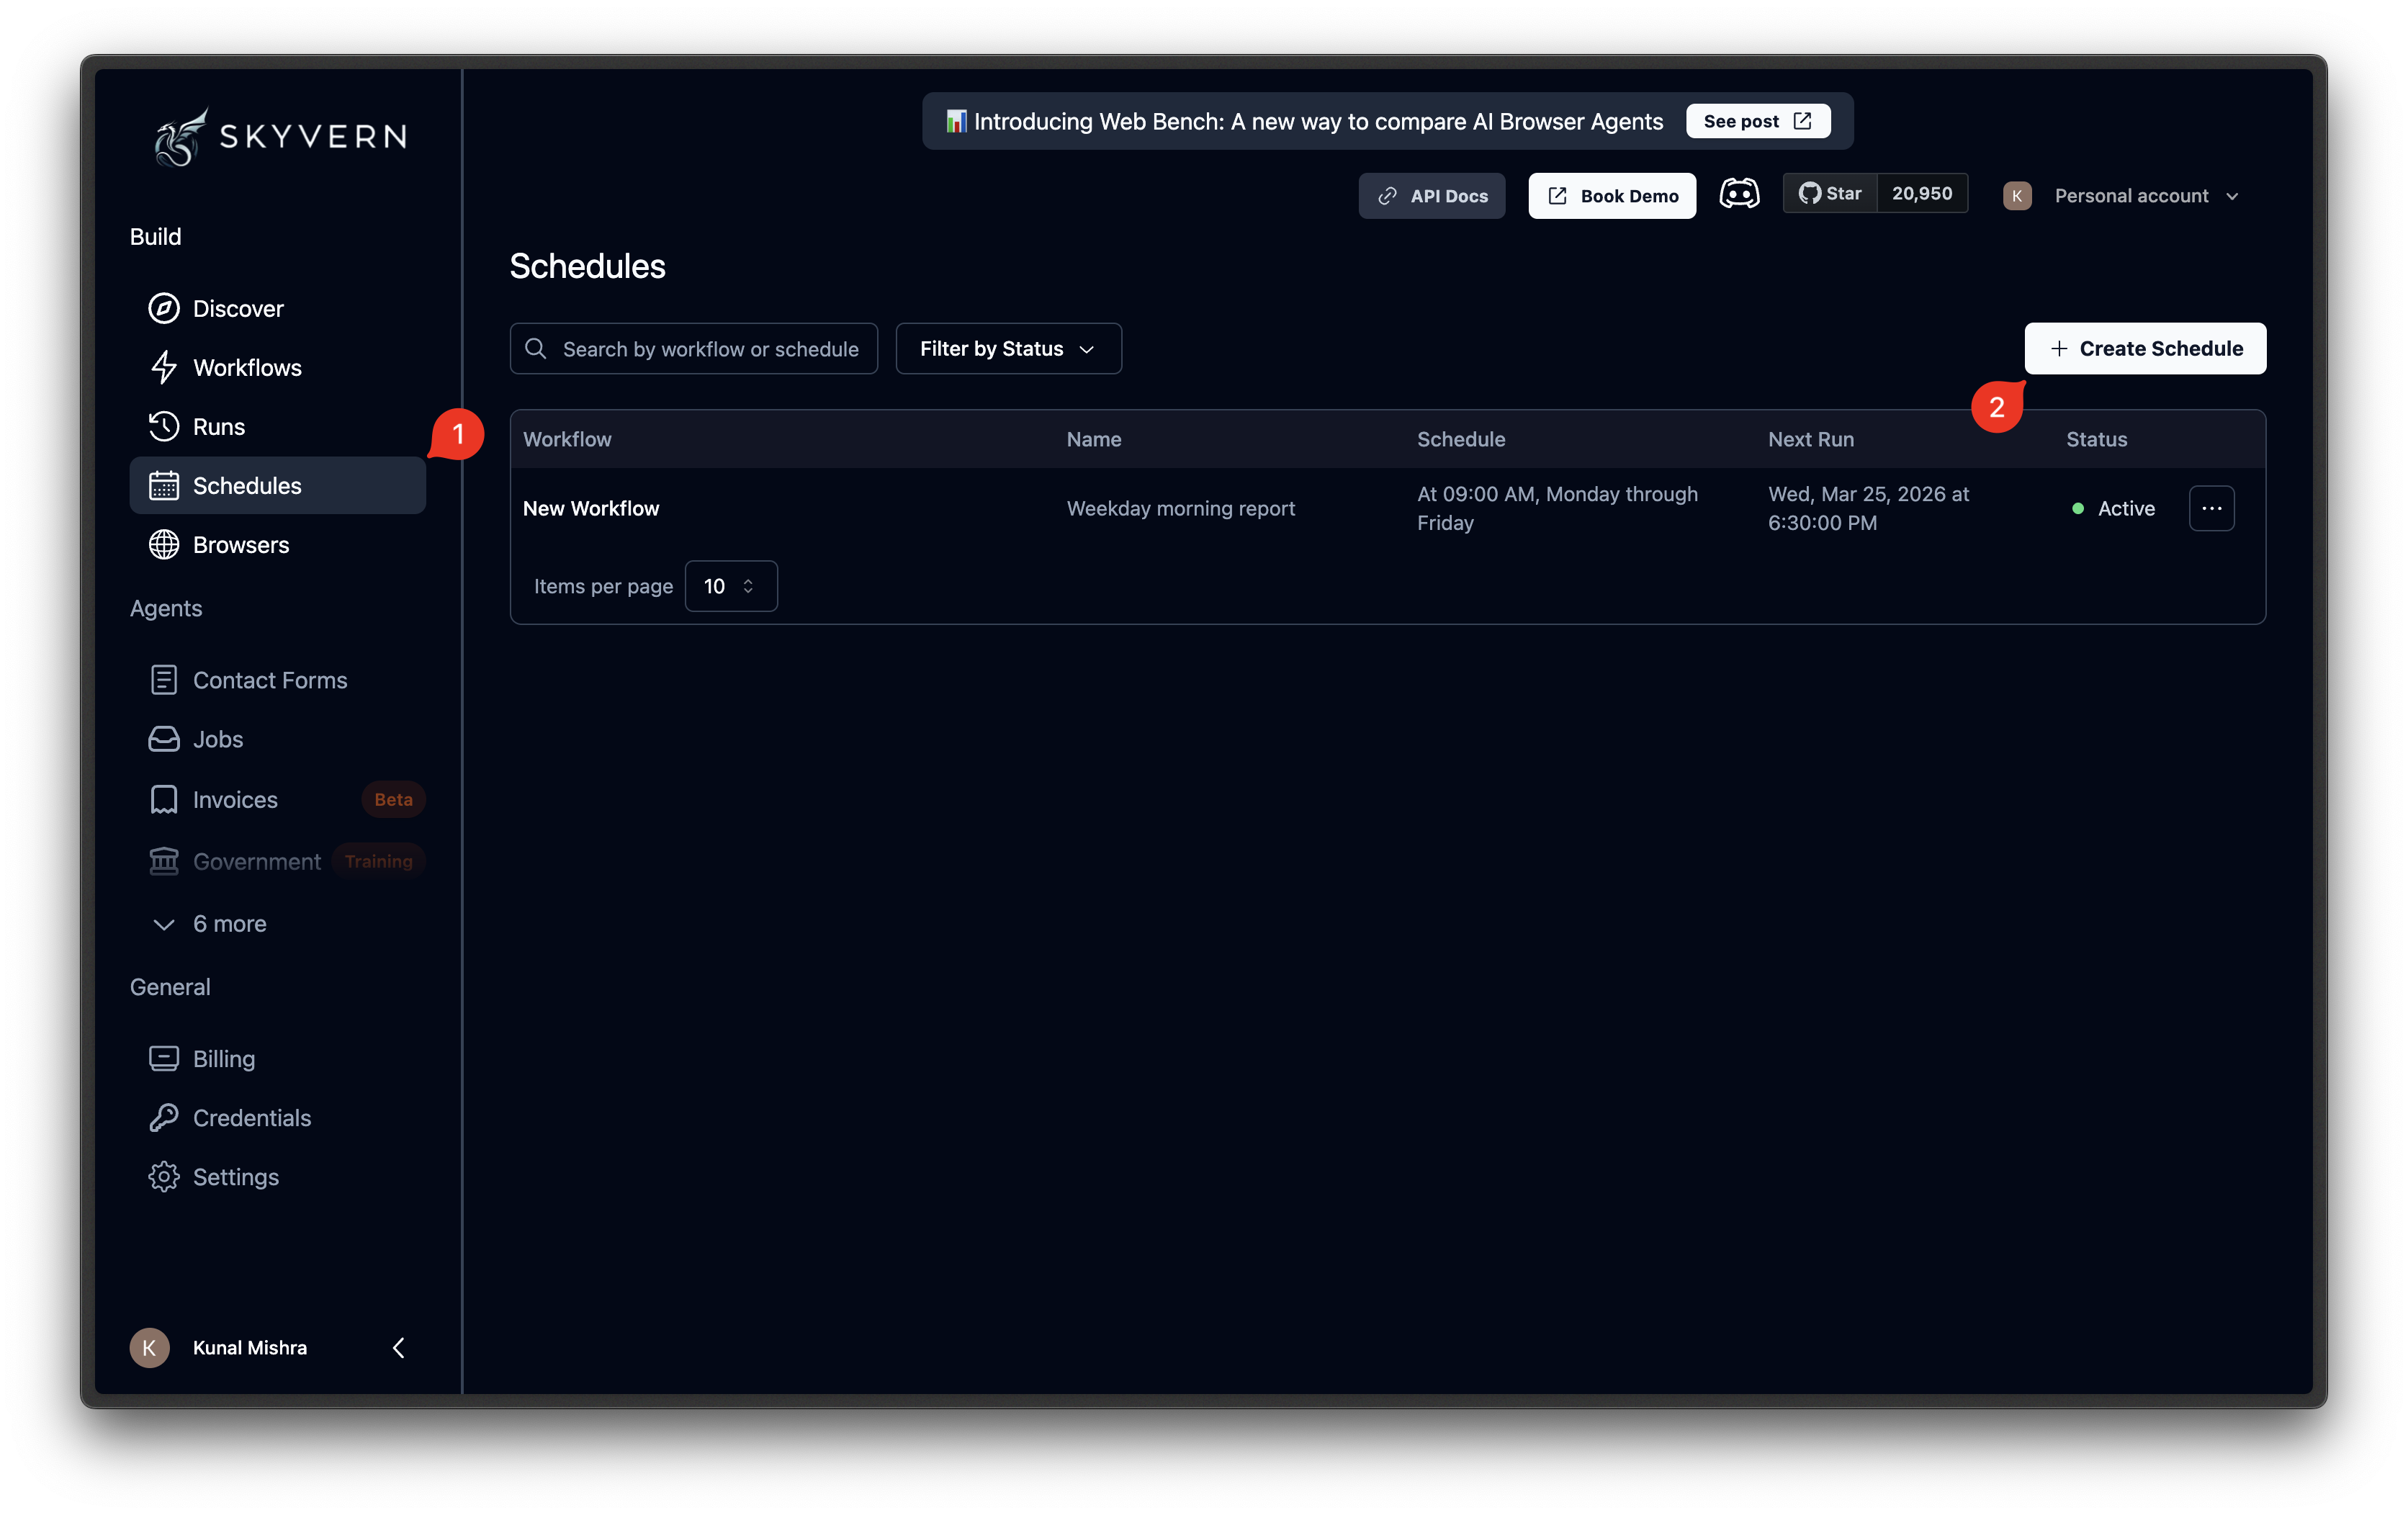
Click [**Schedules**](https://app.skyvern.com/schedules/) (calendar icon) in the left sidebar.
Click Create Schedule in the top right corner.
 Choose the agent you want to schedule from the dropdown. Only saved agents appear in this list. Then fill in the cron expression, timezone, and optionally a name and description. Check the **Next Scheduled Runs** preview to verify the upcoming execution times match your expectations.
 Click **Create Schedule**. The schedule starts in an **Active** state and triggers at the next scheduled time.
Navigate to [**Agents**](https://app.skyvern.com/workflows/) in the sidebar and click the agent you want to schedule.
In the editor header bar, click the Schedule button (clock icon).
Click **Create Schedule**. The schedule starts in an **Active** state and triggers at the next scheduled time.
Navigate to [**Agents**](https://app.skyvern.com/workflows/) in the sidebar and click the agent you want to schedule.
In the editor header bar, click the Schedule button (clock icon).
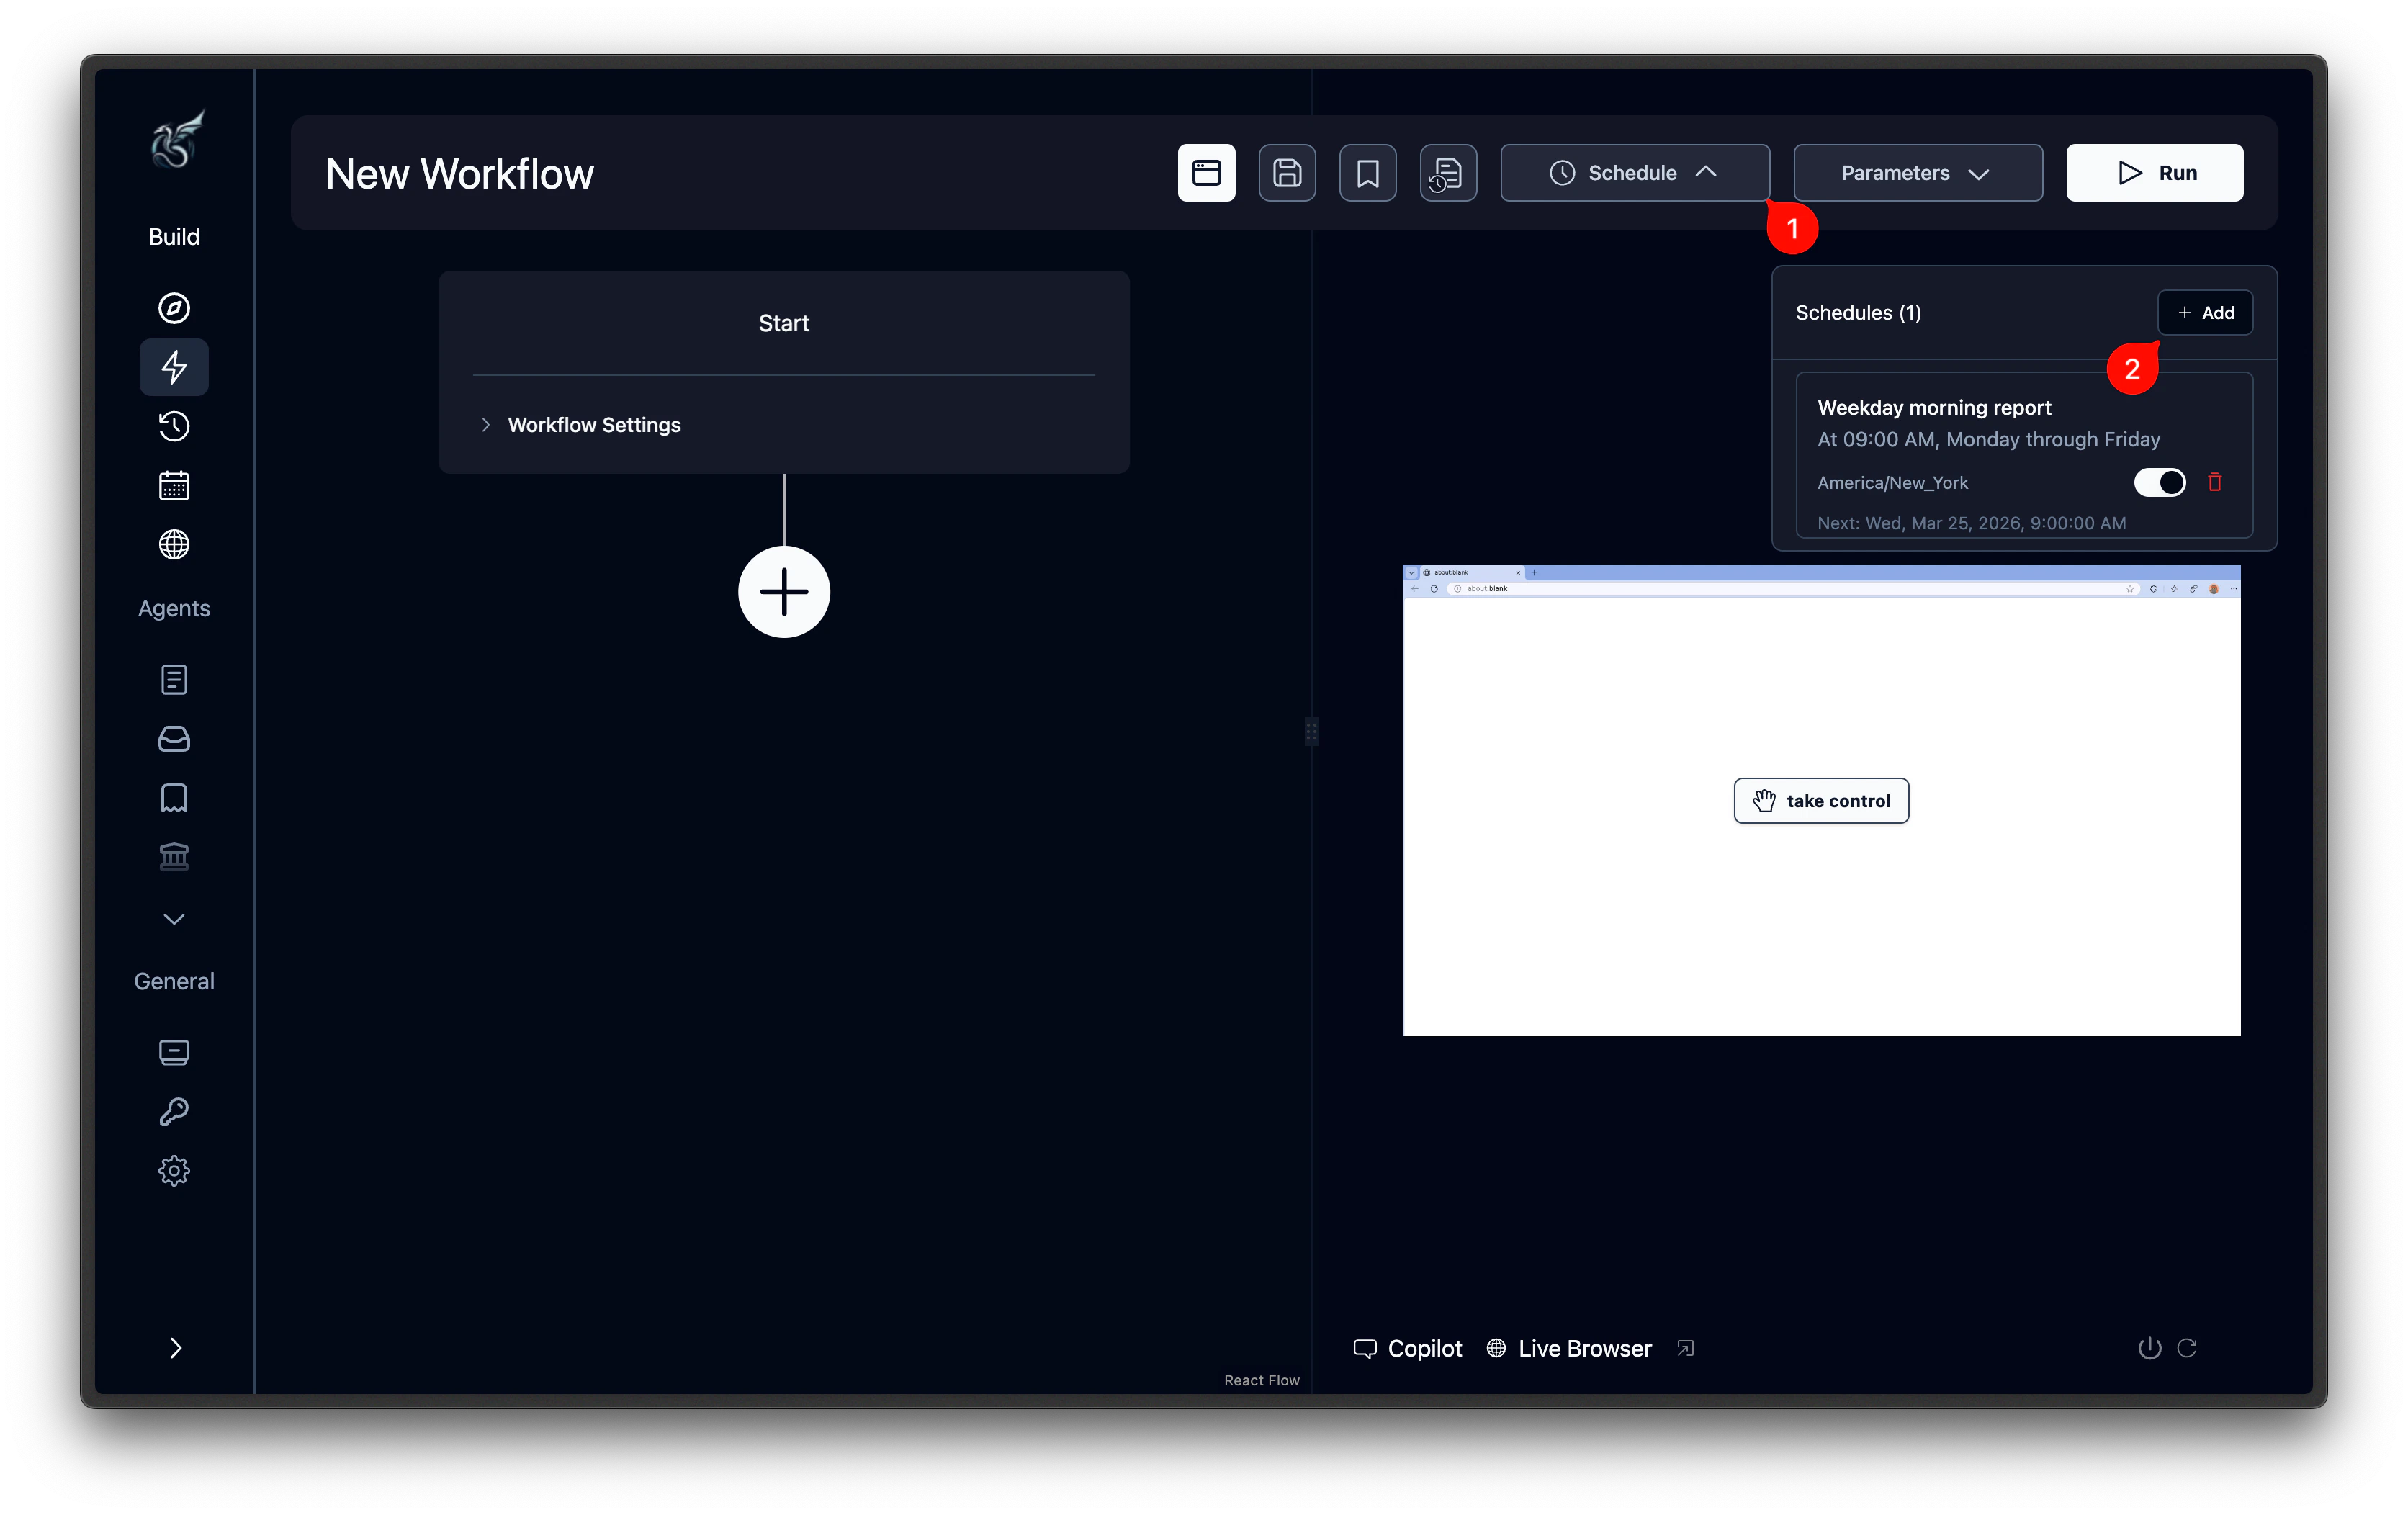 A panel opens showing any existing schedules for this agent. Click Add to create a new one. Fill in the cron expression, timezone, and optionally a name and description. The agent is already selected.
Click **Create Schedule**. The schedule appears in the panel and starts immediately.
***
## The Schedules page
Click **Schedules** in the left sidebar to see every schedule across all agents.
Each row shows:
| Column | What it shows |
| ------------ | ------------------------------------------------------------------ |
| **Agent** | The agent this schedule triggers |
| **Name** | Schedule name |
| **Schedule** | Human-readable cron description (e.g., "Every weekday at 9:00 AM") |
| **Next Run** | Next execution time in your local timezone |
| **Status** | **Active** (green) or **Paused** (gray) |
Use the search bar to filter by schedule name or agent title. The status filter narrows to Active or Paused schedules.
***
## Editing a schedule
Click a schedule row to open its detail page.
A panel opens showing any existing schedules for this agent. Click Add to create a new one. Fill in the cron expression, timezone, and optionally a name and description. The agent is already selected.
Click **Create Schedule**. The schedule appears in the panel and starts immediately.
***
## The Schedules page
Click **Schedules** in the left sidebar to see every schedule across all agents.
Each row shows:
| Column | What it shows |
| ------------ | ------------------------------------------------------------------ |
| **Agent** | The agent this schedule triggers |
| **Name** | Schedule name |
| **Schedule** | Human-readable cron description (e.g., "Every weekday at 9:00 AM") |
| **Next Run** | Next execution time in your local timezone |
| **Status** | **Active** (green) or **Paused** (gray) |
Use the search bar to filter by schedule name or agent title. The status filter narrows to Active or Paused schedules.
***
## Editing a schedule
Click a schedule row to open its detail page.
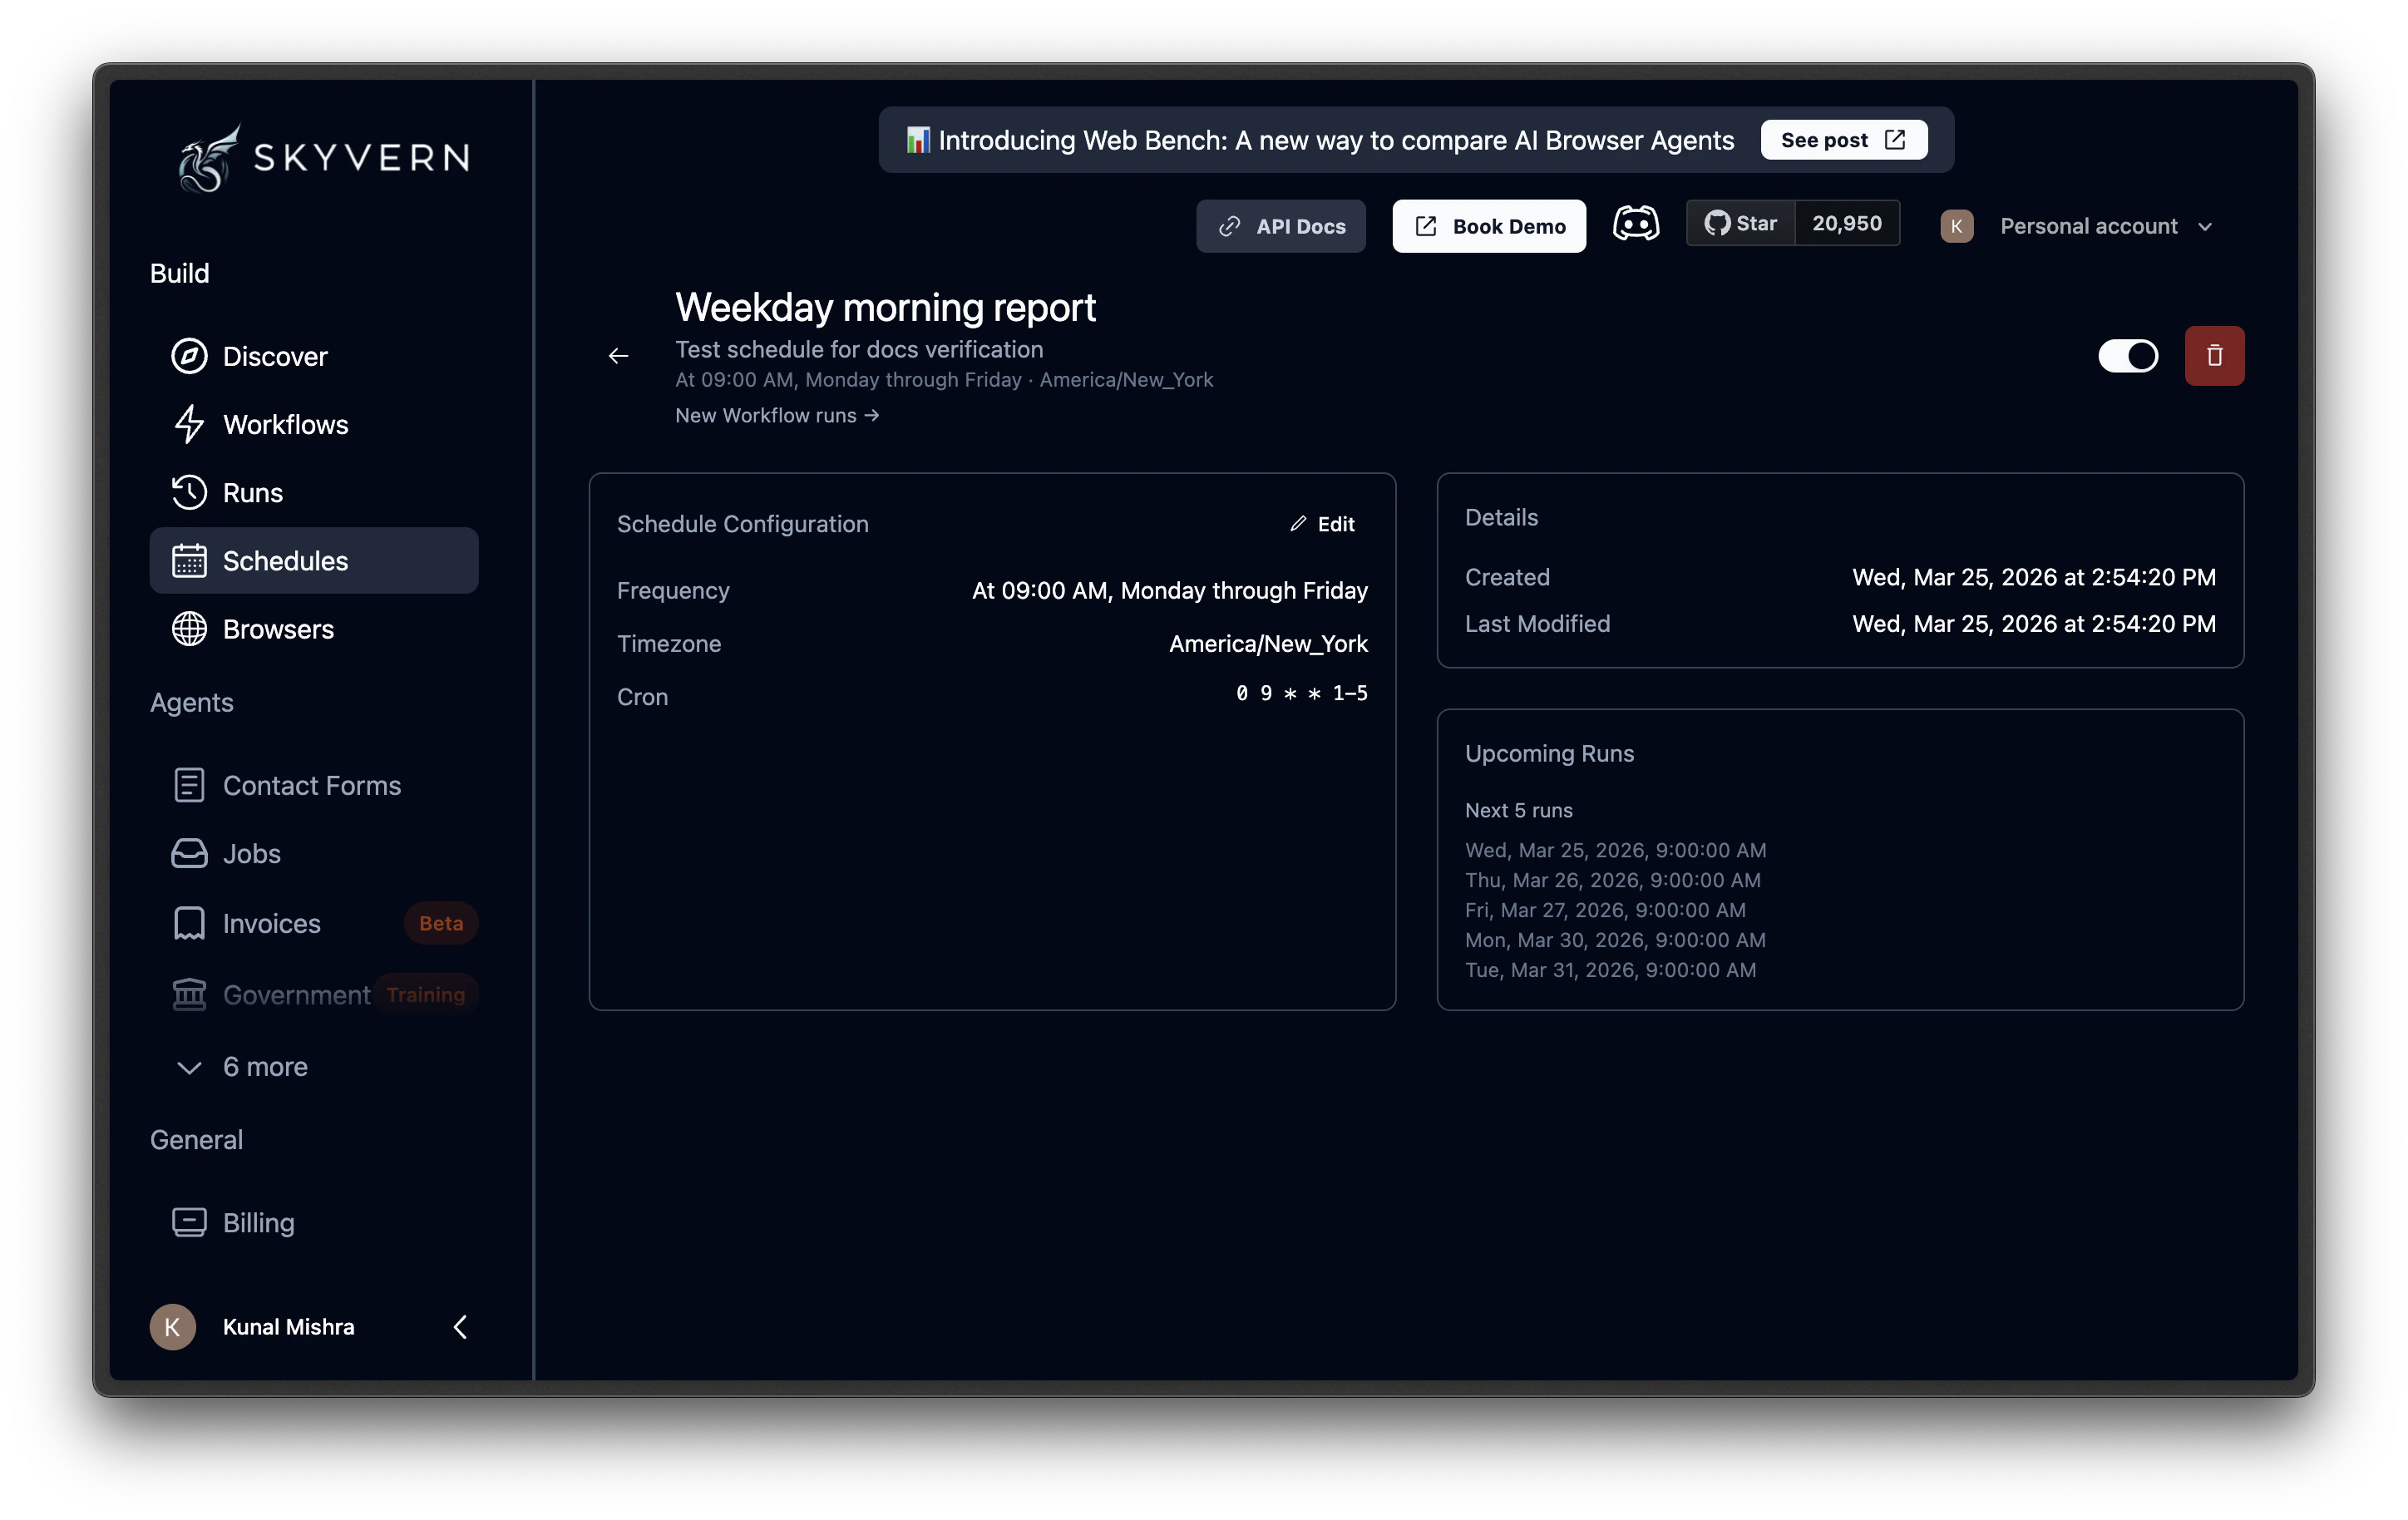 On this page, you can:
* **Edit the schedule configuration**: Click the **Edit** button to change the frequency, timezone, cron expression, name, and description. Changes take effect immediately and the **Upcoming Runs** preview updates to reflect the new configuration.
* **View schedule details**: See when the schedule was created and last modified.
* **Preview upcoming runs**: Check the next 5 scheduled execution times in the **Upcoming Runs** section.
* **Pause or resume**: Toggle the **Status** switch to pause the schedule. Paused schedules keep their configuration and can be resumed at any time: no runs are triggered while paused.
* **Delete the schedule**: Use the delete button (trash icon) in the header. Deletion is permanent. Runs already triggered by the schedule are not affected.
To change which agent a schedule runs, delete the schedule and create a new one for the target agent.
***
## What's next
Create and manage schedules programmatically
View and filter results from scheduled runs
Manage costs for recurring automations
On this page, you can:
* **Edit the schedule configuration**: Click the **Edit** button to change the frequency, timezone, cron expression, name, and description. Changes take effect immediately and the **Upcoming Runs** preview updates to reflect the new configuration.
* **View schedule details**: See when the schedule was created and last modified.
* **Preview upcoming runs**: Check the next 5 scheduled execution times in the **Upcoming Runs** section.
* **Pause or resume**: Toggle the **Status** switch to pause the schedule. Paused schedules keep their configuration and can be resumed at any time: no runs are triggered while paused.
* **Delete the schedule**: Use the delete button (trash icon) in the header. Deletion is permanent. Runs already triggered by the schedule are not affected.
To change which agent a schedule runs, delete the schedule and create a new one for the target agent.
***
## What's next
Create and manage schedules programmatically
View and filter results from scheduled runs
Manage costs for recurring automations